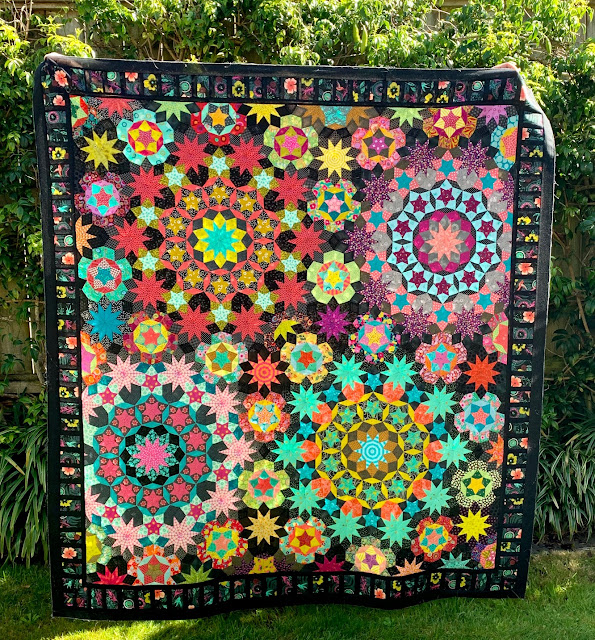
Friday 24 April 2020

Supporting our local quilt shops

Many of you kindly complement me on the fabrics that I use and tell me that you never see fabrics like the ones that I have - well, thank you!

The secret to my stash is that I love buying fabrics in person at local quilt shops and at quilt shows.  I enjoy poking around in quilt shops and pulling unexpected combinations off the shelves.  All of the photos in this post are of fabrics that I've purchased in local quilt shops over the past year.

from All Things Bernina in Auckland

 from Quilting Shed at Auckland Symposium

The road ahead for many people and businesses is going to be very tough.  Some of our favourite independent cafes, clothing boutiques, garden centres and QUILT SHOPS will struggle to survive during the tough economic times ahead.

I'm writing this post to ask you to please support your local quilt shops if you can. I've added a new page to my blog with links to New Zealand quilting businesses - click here to view it.

from Nancy's Stitch Studio in Wellington

from Busy Bee Quilt Shop in Wellington

When our Prime Minister, Jacinda Adern, announced New Zealand was going into lock down, she stressed "Be Kind".  At the time I thought that was a ridiculous message and that we needed strong leadership, not warm fuzzies.  But, I've been proved wrong, and the "Be Kind" message has helped us all to get through this stressful time.

So I'm asking you to be kind to your local quilt shops if you can.

 from Quilters' Lane in Masterton

from The Ribbon Rose in Auckland

Local quilt shops provide:
1. Inspiration.
I love visiting quilt shops and seeing what's new on the shelves.  I like to see the fabrics in person before I buy.  I get inspiration from the samples on display.  I chat with the owners and staff and learn about new things.

2. Knowledge
I like to ask the staff in my local quilt shop for advice when I'm stuck (or just indecisive).

3. Community
The owners and staff at our local quilt shops are our friends and neighbours.

4.  Selection
Our local quilt shops stock a wide range of products.  You may never have had the time to have a good look around, but I bet there's a lot more things in your local quilt shops than you even knew about.

Purchased at Tote and Gloat in Palmerston North

I love exploring the vendors' stands when I go to quilt shows.  Imagine if we had no local vendors in the future! There would be no shopping at quilt shows.  Wouldn't that be sad?

Purchased from a range of vendors at the Sydney Quilt Show in 2019

Here's how you can support your local quilt shops:

Change your buying pattern
Instead of ordering that whole fat quarter bundle of Tula Pink's latest release from an overseas shop, how about waiting for it to get to your local quilt shop and buying half yards of the prints you really love and will use.  Have you ever used all of those fat quarters you received in that last bundle you bought on line? Is it really a saving if you don't use all the fabric?

Give them feedback
If your local quilt shop doesn't stock the type of fabrics you like, be honest - tell the owner nicely what it is that you're into.  Tell them how much of that product you might buy in a year.  Tell them about local friends who think the same way as you do.  If enough people say the same thing, I'm sure the owner will start listening and might just order in some of what it is that you like.  Business owners will be putting customer satisfaction at the top of their list now.

Show them what you're working on
Take your current quilting project into the shop.  It doesn't matter if you bought the materials from another shop.  You're here now, and this quilt represents who you are.  Show them what you like and help them to understand what you might buy in the future.

Mention them on social media
Give credit where it's due.  Tell people where you bought your supplies so others can enquire or visit that shop too.

Purchased from Material Obsession in Sydney

Please don't tell me how you've tried all these things over the years and your local quilt shop owners  just don't listen.  Give them another chance now.  The world has changed, and everyone deserves a second chance.  As our Prime Minister has said throughout this pandemic - "Be Kind".

Purchased from AQC show in Melbourne in 2018

I hope you don't feel that this post has been a lecture.  I only wrote it because I know a lot of New Zealanders read my blog, and I think it's important that we support our local businesses at this time.  I don't get paid or receive discounts for supporting local businesses - I genuinely feel it's important.

As always, feel free to leave a comment below if you agree or disagree.


So, now it's time for the Peacock Party.  Everyone has been so productive over the past few weeks.  I'm looking forward to seeing all your new posts over the weekend.


You are invited to the Inlinkz link party!
Click here to enter


Friday 17 April 2020

You Spin Me Round

Yes, I have a finished quilt.  I'm very pleased to present "You Spin Me Round".


I'll smile each time I say the name because I love this song from 1985.  Click the button in the centre of the image and have a dance around your lounge!


Anyway, back to the quilt.  I made this quilt using the Cartwheel pattern designed by Liza Prior Lucy and published in Quilt Grandeur by Kaffe Fassett.

You can read my earlier blog posts about it here:
Nov 2018
March 2019
July 2019 - hand quilting commenced
Feb 2020

I hand quilted along the black lines with Aurifil 12wt in black

I hand quilted in the ditch with Aurifil 28wt


The wool batting and hand quilting means it's full of texture

So as you can see, it's taken me more than a year to make this quilt, but I've really enjoyed making it.  I like to take my time when I'm quilting.  I hate being rushed and working to a stressful deadline.  I usually have multiple quilts on the go at the same time, and that stops me getting bored with any of them.

In a first for me, I changed the binding after I'd completely finished the quilt. Yes, I've never done that before, but I'd used Kaffe's Millefiori fabric from my stash, and although it was OK, I thought I could do better.  So I took my quilt to my local quilt shop and tried many options before I settled on Good Vibrations - also from the Kaffe Fassett Collective.


I love the strong blue for the binding, and how it truly finishes the quilt.

I know some of you will be wondering about the rainbow ric rac.  I got it from Spotlight in New Zealand.


I've entered this quilt into the Sydney Quilt Show and all going well, it will be there in October 2020, even if I can't attend myself.


Now it's time for the Peacock Party.  What have you been up to this week? Have you managed to finish anything?  Feel free to link up a recent blog post below.


You are invited to the Inlinkz link party!
Click here to enter


Friday 10 April 2020

Cross Country Quilt

This week I've been working on my Cross Country quilt, designed by Anna Maria Horner.


I attended a wonderful lecture and class with Anna Maria back in November 2019.  You can read all about it here.


Anna Maria showed us three different versions of her Cross Country quilt (see above).  They all have the giant "X", but the arms of the X are worked in different ways.  I decided to make the version on the right that looks like this:


However, when I got home, I decided that I didn't really want to piece the centre of the X's, so I dug through my stash and found two half yards of Kaffe Fassett Artisan fabric that do the job perfectly. You might notice that I've bordered it with some on Anna Maria Horner's latest Conservatory fabric to provide a break between the heavily patterned areas. 


Using this "cheater" fabric means that I still have enough enthusiasm to applique flowers onto the giant triangles when I get to that stage.  I might do some applique like this:


I know the fabric that I want for the giant triangles, but it's in Australia and I'm in New Zealand.  I'll just have to put this quilt aside now and work on something else for a while.


It's time for the Peacock Party.

What have you been up to this week? Are you still merrily working through your stash and WIPs? Or are you slowly realising that having limitless sewing time isn't quite as good as you thought it might be?  Feel free to link up a blog post below, or if you're not a blogger, feel free to leave a comment.


You are invited to the Inlinkz link party!
Click here to enter


Sunday 5 April 2020

Ballet with Kaffe - How I attached the borders

My quilt top is finished!! And I love it. 

I always knew that I wanted to include my inspiration fabric somewhere in my Ballet with Kaffe quilt.


I had intended to use it for the borders, but then I realised that the pattern repeat was quite obvious, and the repeating motifs would stand out on the borders.  So I decided to piece my borders and allowed snippets of my inspiration fabric to peek through.


 I knew that Willyne Hammerstein had pieced the borders on her Moncarapacho quilt, so I followed her method set out in Millefiori Quilts book 3.

Moncarapacho by Willyne Hammerstein

I used the same measurements as Willyne, but instead of making a crazy patchwork strip, I used my inspiration fabric.

1.  Piecing the borders

I decided to foundation paper piece the borders for accuracy.  I created a template on my computer and printed off lots of copies.


When I foundation paper piece like this, I sew multiple strips at once.  I sew one piece on to each of many strips, and then I get up and press them all, and return to add another piece to all of the strips.


I kept making strips and joining them until I had enough to make the 4 borders.


I made sure that each border was the length of the edge, plus the width of the border times 2, plus a bit more for good measure.  I did this because I knew that I wanted to mitre the corners.

Preparing to mitre the corners

2. Attaching the borders

I know this bit is stressful.  I spent more than two years English Paper Piecing my quilt top, and I didn't want it to unravel.  When I attached the borders to my la passacaglia quilt (click here to see) I left the paper pieces in the edge row, but this time I took them out first.  I had learnt from my la passacaglia experience, and as I had sewn the edge pieces on my Ballet quilt, I had taken extra care to secure the threads so the seams wouldn't unravel.  

I took the final paper pieces out of the edge pieces of my quilt, and pressed all the seam allowances open. (As for the rest of the quilt, I just pressed from the front - it's impossible to get all of these seam allowances sitting neatly.) 


Then I lay my quilt top on top of the border.

ready to bring the quilt top over the border

Based on the diagrams in the book, I knew which pieces would align with the border's edge, so I pinned those pieces into place first.  Then I added more pins so it wouldn't move during sewing. I used a lot of pins!


I sewed the border on with the border facing me so I could stitch an even 1/4" seam. I didn't worry about which way the seam allowances were sitting underneath.


I checked on the front that the seam was straight and where I wanted it to be.  I only trimmed away the excess quilt top once I had stitched the border on and checked the seam position. Trimming was the final step of stage 2 - Attaching the Borders.


3.  Mitring the corners

It's been a long time since I've mitred corners, but it's definitely easier the second time around.  There are plenty of tutorials about mitring corners, but I'll just show a few photos of what I did.  If you haven't done it before, I suggest you consult a full tutorial before you try this.

I folded the quilt right sides together so the borders lay on top of each other

I lay the ruler along the folded edge of the quilt (bottom left in photo),
with the 45 degree line on the edge of the border. (where my pen is).
Then I drew a stitching line across the bottom of the ruler.  

The stitching line pinned and ready to sew.
I sewed along the marked line.

After I'd sewn the seam and checked it from the front, I trimmed off the excess borders 1/4" from the seam.

Look at that!!! It's perfect.  I know that the windows don't match up, but that was very unlikely given the design of the borders.  I don't mind because the borders are very dark and it won't be very obvious.  


Then I hand stitched the corners closed where the machine stitching finished before the corners.

Hand stitching the corners closed.

Finally I took the foundation paper pieces out.  I left them in all this time to stabilise the borders and prevent stretching.


So there you have it.

I know it sounds like a lot of effort, but I love the result so it's totally worth it to me.  I do intend to hand quilt my Ballet with Kaffe quilt, but I'm going to take a little break and work on some other things first.

You can find my other posts about my Millefiori Quilts on the tabs at the top of my blog:

la Passacaglia

Ballet with Kaffe 


Friday 3 April 2020

My Kantha pouches

I finished my Kantha quilting challenge for this week.  A couple of weeks ago I told you I was experimenting with Kantha quilting for an Aurifil Artisan challenge here.

Well, I finished my panels and I turned them into Openwide pouches (pattern by Noodlehead here).


I love the easy, relaxed look of Kantha quilting, and I enjoyed making these bags.  I'm definitely going to use this technique again in the future. The joy of Kantha quilting is that you don't have to draw lines and precise - it's meant to look rustic.

Just a reminder - I used Aurifil 12wt in contrasting colours.  I even used the variegated threads and they look good against the Kaffe Fassett Fabrics too.


I chose to make the medium size pouch, because that allowed me to get two pouches out of one fat quarter (with another for the backing, and a third for the lining).

Once I'd finished quilting my panels I knew that I needed to secure the threads, so I machine stitched just inside my cutting lines with a short stitch length.  Only then did I cut up my fat quarter into panels for the bags.  I didn't want my lovely Kantha quilting to unravel!


I chose some other cheery Kaffe Fassett prints for the lining. I like the interiors of my bags to be light colours so I can find my stuff in there!


So, there you are.  Two quick and relatively easy Open Wide Pouches made from Kantha quilted panels.  I encourage you to give it a go.

Updated: I bought the zips from Studio Mio in Australia - https://studiomio.com.au/zippers/

I've made this pattern previously, and it makes a great pouch for when you want to take some hand stitching along with you. 


What have you been up to this week?  Feel free to share a recent blog post below.


You are invited to the Inlinkz link party!
Click here to enter