Showing posts with label how to attach borders to epp. Show all posts

Friday, 15 October 2021

Mitered corners

Mitered corners - they look so good, but they're not always easy.  


My first mitered corners were on my la Passacaglia quilt above, and they worked out well. 


My second attempt was on my Fireworks quilt (Ballet with Kaffe), and although the pattern didn't match perfectly, it wasn't too noticeable because the border is mainly black.


I also used mitered corners on my Trans-Tasman Bubble quilt (Aussies and Kiwis - remember the Trans-Tasman Bubble??). 

The navy and white striped border needed to be mitered in the corners to allow the pattern to flow. 


Now I'm ready to attach the borders to the Raindrops are Falling on my Head quilt, but the fabric isn't meeting nicely in the corners. 


The length of the sides doesn't match the pattern repeat on the fabric.  So I can either leave it as it is (top left corner), or insert cornerstones to avoid the issue.  

The three fabrics in the corners above are just me narrowing down my options.  I think if I do go for cornerstones, it will be the Kaffe spot in the bottom right corner above.  Of course I didn't have enough of it, so I went and bought more this morning, just in case I do decide to use it.  

I think I'll just walk around this quilt all weekend while I decide what I want to do.  Feel free to leave a comment below if you have a suggestion. 

(Gayle from Hamilton asked the other week where I got a grey spotted fabric from.  I'm sorry to say I bought the last piece of it, but send me an email because I might be able to spare some.  I bought a whole metre.  I can't reply to your comment because you're a No Reply Blogger.)

Now it's time for the Peacock Party.  Feel free to link up a recent blog post below.


You are invited to the Inlinkz link party!

Click here to enter

Sunday, 5 April 2020

Ballet with Kaffe - How I attached the borders

My quilt top is finished!! And I love it. 

I always knew that I wanted to include my inspiration fabric somewhere in my Ballet with Kaffe quilt.


I had intended to use it for the borders, but then I realised that the pattern repeat was quite obvious, and the repeating motifs would stand out on the borders.  So I decided to piece my borders and allowed snippets of my inspiration fabric to peek through.


 I knew that Willyne Hammerstein had pieced the borders on her Moncarapacho quilt, so I followed her method set out in Millefiori Quilts book 3.

Moncarapacho by Willyne Hammerstein

I used the same measurements as Willyne, but instead of making a crazy patchwork strip, I used my inspiration fabric.

1.  Piecing the borders

I decided to foundation paper piece the borders for accuracy.  I created a template on my computer and printed off lots of copies.


When I foundation paper piece like this, I sew multiple strips at once.  I sew one piece on to each of many strips, and then I get up and press them all, and return to add another piece to all of the strips.


I kept making strips and joining them until I had enough to make the 4 borders.


I made sure that each border was the length of the edge, plus the width of the border times 2, plus a bit more for good measure.  I did this because I knew that I wanted to mitre the corners.

Preparing to mitre the corners

2. Attaching the borders

I know this bit is stressful.  I spent more than two years English Paper Piecing my quilt top, and I didn't want it to unravel.  When I attached the borders to my la passacaglia quilt (click here to see) I left the paper pieces in the edge row, but this time I took them out first.  I had learnt from my la passacaglia experience, and as I had sewn the edge pieces on my Ballet quilt, I had taken extra care to secure the threads so the seams wouldn't unravel.  

I took the final paper pieces out of the edge pieces of my quilt, and pressed all the seam allowances open. (As for the rest of the quilt, I just pressed from the front - it's impossible to get all of these seam allowances sitting neatly.) 


Then I lay my quilt top on top of the border.
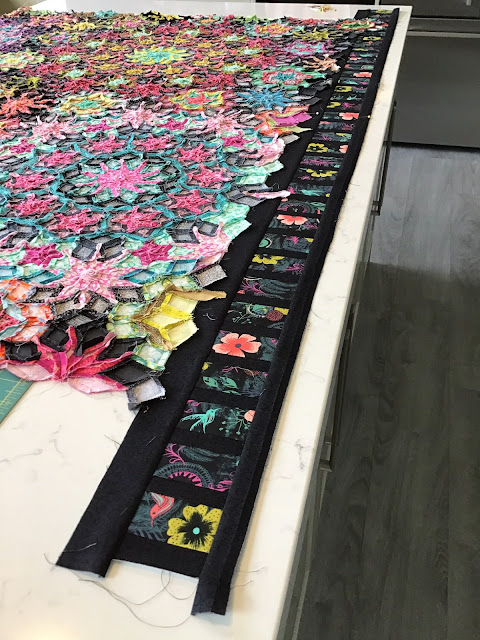
ready to bring the quilt top over the border

Based on the diagrams in the book, I knew which pieces would align with the border's edge, so I pinned those pieces into place first.  Then I added more pins so it wouldn't move during sewing. I used a lot of pins!


I sewed the border on with the border facing me so I could stitch an even 1/4" seam. I didn't worry about which way the seam allowances were sitting underneath.


I checked on the front that the seam was straight and where I wanted it to be.  I only trimmed away the excess quilt top once I had stitched the border on and checked the seam position. Trimming was the final step of stage 2 - Attaching the Borders.


3.  Mitring the corners

It's been a long time since I've mitred corners, but it's definitely easier the second time around.  There are plenty of tutorials about mitring corners, but I'll just show a few photos of what I did.  If you haven't done it before, I suggest you consult a full tutorial before you try this.

I folded the quilt right sides together so the borders lay on top of each other

I lay the ruler along the folded edge of the quilt (bottom left in photo),
with the 45 degree line on the edge of the border. (where my pen is).
Then I drew a stitching line across the bottom of the ruler.  

The stitching line pinned and ready to sew.
I sewed along the marked line.

After I'd sewn the seam and checked it from the front, I trimmed off the excess borders 1/4" from the seam.

Look at that!!! It's perfect.  I know that the windows don't match up, but that was very unlikely given the design of the borders.  I don't mind because the borders are very dark and it won't be very obvious.  


Then I hand stitched the corners closed where the machine stitching finished before the corners.

Hand stitching the corners closed.

Finally I took the foundation paper pieces out.  I left them in all this time to stabilise the borders and prevent stretching.


So there you have it.

I know it sounds like a lot of effort, but I love the result so it's totally worth it to me.  I do intend to hand quilt my Ballet with Kaffe quilt, but I'm going to take a little break and work on some other things first.

You can find my other posts about my Millefiori Quilts on the tabs at the top of my blog:

la Passacaglia

Ballet with Kaffe 


Tuesday, 30 August 2016

How to attach borders to English Paper Piecing

A number of people have asked me how I attach borders to my English Paper Piecing.  I did write a blog post here when I attached the borders to my la passacaglia quilt, but I also took some photos as I finished up my Tumbling Colors and Inner City quilts, so will explain again here.


Here's what I did:

1. I decided where I wanted my borders to sit on my quilts.  Often there's two opposite easy edges with straight lines, and the other two edges are a bit trickier. I'll deal with the easy sides first.

the side of this quilt are straight, but the top and bottom aren't

2. I removed the paper pieces from the edge pieces and pressed the seam allowances out so they sat flat.


3. I laid the 1/4" mark on the ruler on the exact point where I wanted the border to meet the centre of the quilt.  I then trimmed with the rotary cutter so I had a 1/4" seam allowance to sew with. I had pieced with 3/8" seam allowance so there was a bit to trim off.


note that the 1/4" line is on the point where the paper pieces meet - see 9 3/4" on the ruler.

4.  I cut my border strips in the usual manner (measure across the centre of the quilt and cut to that length), pinned carefully, and sewed on the machine with the 1/4" foot.


5.  I pressed the seam towards the border and admired the beautiful points!


6. Now for the top and bottom of this quilt.  Once again I had to decide where I wanted the border to sit.  I laid the 1/4" mark on the ruler where I wanted the border to meet the centre. I had to cut off more on the top and bottom, just because of the way this design is. Think of it like a brick wall.  The top and bottom may be complete rows, but there will always be half bricks to on the sides.

see the 9" mark is sitting right on a point.

again - nice tidy points at the top

7. Different designs will need to be treated differently.  Here's how I trimmed my Tumbling Colors quilt.  I knew I was going to trim the top row, so only pieced half diamonds to avoid wastage.


I retained the points down the right hand side


8.  The back of the quilt is still very messy, but that's what happens with English Paper Piecing (EPP).  I did use my applique scissors to very carefully trim some of the excess points, but then I just turned it over and pressed it flat from the front.  I really don't worry about the seams sitting flat on EPP.


I hope you find that useful. I'm currently hand quilting both of these quilts with bright threads and big stitch hand quilting.  I'll show you once they are finished.