Wednesday 28 September 2016

Voting is now open in the Bloggers' Quilt Festival

As promised, I'm back to tell you that voting is now open in the Bloggers' Quilt Festival hosted by Amy of Amy's Creative Side.

Each person gets 3 votes in each category.  To cast your vote for a quilt you need to click on the heart in the top right hand corner of the thumbnail like this:


Amy's website isn't very easy to navigate, so here are the links to my quilts if you'd like to vote for them:


My la passacaglia is in the Viewers' Choice section here:

http://www.amyscreativeside.com/2016/09/19/bloggers-quilt-festival-fall-2016-edition/

(Thank you so much if you were one of the people who nominated my quilt for the Viewers' Choice category - I'm honored to know so many people like it and voted for it.)

and also the Hand Quilting section here:

http://www.amyscreativeside.com/2016/09/19/bqfhand-quilted-quilt-category/


My Honeycomb Spin is in the Small Quilts category here:

http://www.amyscreativeside.com/2016/09/19/bqfsmall-quilt-category/

Voting is open until this Friday, 30 September.  You don't need to vote in every category, or even use all 3 votes in each section, so just pop on over and vote for your favourites if you've got time.

PS Cathy Melancon - I'd love to reply to your emails, but you're a no reply blogger and I can't track down your email address.  Can you email me directly so I can see you email address please?  thanks.  wendysquiltsandmore at gmail dot com

Monday 26 September 2016

My Zebra

A couple of weeks ago I was fortunate to attend a class with Juliet van der Heijden, who you might know as the Tartan Kiwi. This is what I made - a 20" zebra mini quilt.


We spent the day learning some tips and tricks for foundation paper piecing and working on our zebras.  Our aim was to make Juliet's 20" zebra pattern and by the end of the day we had got this far:

that's Juliet's on the left - the class sample.

I came home and continued to work on mine while I still had the ideas in my head.  I laid out all my greens and yellows and tried to plan each section before I started piecing it. It's quite confusing because everything is mirror image with foundation paper piecing. I wanted to keep the light colours close to the zebra, and the dark colours on the outside edges.  I thought it would look like the zebra was emerging from the bush - not sure if I achieved that or not, but I like it anyway.


I got my zebra assembled without too much unpicking.  I was very happy with my finished zebra, but I didn't know how to quilt him.  I knew he would sit unfinished for years if I waiting until my free motion quilting was up to speed, and I didn't want to hand quilt it due to all the bulky seam allowances.

I've long admired the beautiful quilting Donna Ward does on mini quilts, so asked her if she might quilt my zebra for me. Donna kindly agreed and free motion quilted it for me on her domestic machine.  I'm thrilled with what she did - it's so far beyond anything I could do at the moment.


My zebra now has a hanging sleeve and is ready to hang on the wall. I like to put hanging sleeves at the top and the bottom of my small quilts, because often the bottom edge can be a bit wavy and inserting another wooden rod can keep it hanging straight.

If you want to make your own zebra you can find this pattern in Juliet's Etsy store here
or on Payhip here.

PS a friendly reminder - voting in the Bloggers Quilt Festival starts tomorrow.

Tuesday 20 September 2016

Blogger's Quilt Festival - la passacaglia - hand quilted

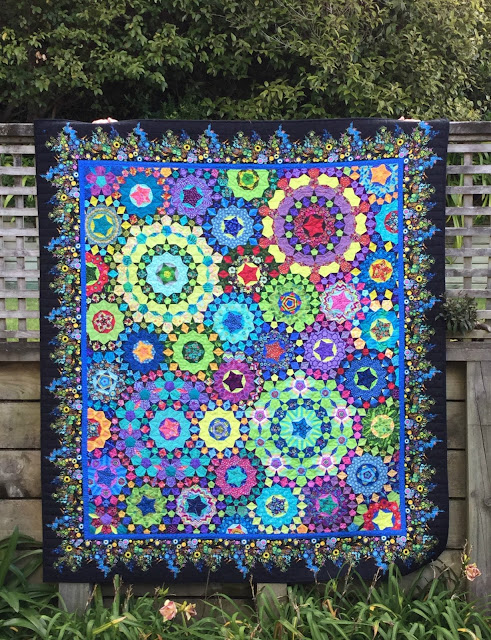
Hello and welcome.  Here is my second entry in the Blogger's Quilt Festival. It's my la passacaglia quilt, which is in the hand quilted category.


This beautiful pattern was designed by Willyne Hammerstein, and is based on the Penrose star.  The pattern is in Willyne's first Millefiori Quilts book.

I English Paper Pieced (EPP) my quilt, and then hand quilted it with Aurifil 28 wt.  Look at all those gorgeous threads!!


I mainly used threads that matched the fabrics.  I felt there was already so much going on in my quilt, the quilting didn't need to fight for attention too!


It took me 18 months to make my quilt, and I learnt a lot of tips and tricks along the way.  I have a full page dedicated to this quilt on my blog, and you can view it here.


Finished size: approx 65" x 75"
Design: Willyne Hammerstein - Millefiori Quilts

Thank you for visiting my blog and reading about my la passacaglia. I love this quilt, and I've enjoyed sharing it with you.  My other quilt in the Bloggers' Quilt Festival is my Honeycomb Spin and you can read about it here.


Voting isn't open yet, but I really encourage you to go and check out all the other quilts in the Bloggers' Quilt Festival. More and more will be added to the linkup until entries close on 24 September. Then voting will be open from 25 - 30 September. Winners will be announced on 1 October.  It really is a great way to see a huge range of quilts from the comfort of your own home.

Bloggers' Quilt Festival - Honeycomb Spin

Hello and welcome if you're visiting my blog for the first time. Yes, the Blogger's Quilt Festival is back - and this time it's for bloggers.


Back in May 2016 Amy decided to hold the festival on Instagram, but it just didn't have the same feel as the original Blogger's Quilt Festival.  I didn't get to read the stories behind the quilts, nor get to know the quilters in the same way. So I'm pleased it's back on blogs this time because I love finding new quilters online.

Here's my first entry. It's my Honeycomb Spin and it's in the Small Quilts category.


I made this quilt in a class at Nancy's Stitch Studio in Wellington, New Zealand.  The tutor was Anna Hicks and it was a very enjoyable class. We used the Modern Hexies technique made famous by Nicole from Modern Handcraft, but we finished them differently.


Laying the hexagons out neatly was the hardest part!


Once the hexagons were all glued into place we quilted in a spiral pattern which really gave the quilt texture and interest.


the back


We finished this quilt with facings rather than binding. It was an interest touch, and a new skill for me.

Finished size: 40" x 25"
Design: Anna Hicks

My other quilt in the Bloggers' Quilt Festival is my la passacaglia quilt and you can read about it here.


Voting isn't open just yet, but I really encourage you to go and check out all the other quilts in the Bloggers' Quilt Festival. More and more will be added to the linkups until entries close on 24 September. Then voting will be open from 25 - 30 September. Winners will be announced on 1 October.  It really is a great way to see a huge range of quilts from the comfort of your own home.

Monday 19 September 2016

la passacaglia - it's finished!!

Yes, it's true.  My la passacaglia quilt is finished and I'm really thrilled with it. I love how all the Kaffe Fassett fabrics provide so much colour and interest.


I started this quilt way back at Christmas 2014, after carefully considering if I could really hand sew a big quilt like this.  I decided to take the plunge, and I'm very glad I did because I've really enjoyed the process, and learnt a lot about colour and pattern.


I chose to English Paper Piece (EPP) my quilt, and this experience has certainly improved my EPP skills.  I'm not afraid to tckle anything that requires EPP now.


I always knew I would hand quilt my la passacaglia because I thought if I was going to hand piece a quilt in a traditional manner, I would hand quilt in a traditional manner too.


You can find links to all my previous posts about this quilt on my la passacaglia / Millefiori tab at the top of the page, or by clicking here . Those posts include:
- how to get started on a quilt like this
- Glue basting vs thread basting
- thread selection
- attaching the borders
- hand quilting


I'm not quite sure where I'm going to put this quilt yet, but it's already got a hanging sleeve on the back, so I just need to find a clear wall space out of the sun.

Thank you for all the support I've received while making this quilt - from my blog followers and readers, the Millefiori/la passacaglia Facebook group, and on Instagram. You've all kept me returning to this quilt when I've drifted off to other things. Thank you.

And yes, I am already thinking about my next millefiori quilt. I already have the templates and paper pieces for Ballet Avec Kaffe Fassett from Willyne's second book - Millefiori Quilts 2. But I know she's working on a third book so I better get a wriggle on.


Finished size - 68" x 77" (173 cm x 196 cm)


PS I did enter my quilt in QuiltMania's competition, but my quilt wasn't one of those chosen by the publishers to hang at the International Quilt Festival in Houston this year. I'm thrilled that my mum's quilt was chosen though, and look forward to seeing photos of it there.

mum's top before she hand quilted it

Saturday 17 September 2016

My Kaffe Sew Together bag

Last weekend I made my second Sew Together bag.  People say they are addictive, and they might be right.  I always intended to make two, and even cut them both out before our retreat in July.


My friend helped me to make my first bag at our retreat, but she didn't want me to use my fancy zippers.  I knew deep down they would work, but I wanted her assistance, so played along and didn't use them.


This time I was at home so could do it my way, and I'm so pleased I did.  I love this Kaffe Fassett bag, and have already found things to store in it.  Now I have two and that will be enough for a while.

I like to hand sew my bindings down.

Pattern is Sew Together Bag by Sew Demented on Craftsy.
The tutorial I used is by Quilt Barn and is on her blog here.

And a link back to my blog post about my first bag is here.

If you're keen to use fancy zippers, here what I did.
1. Source some fancy zippers. There are lots on Amazon.

2. Sew a normal seam and press, and then press wrong side together.


3. Place the zip face down, and then the fabric wrong side down.  Sew along the zip with the zipper foot on.


4. It will look like this:


5.  Turn it over and it will look like this (so use matching thread):


6. Repeat on the other side, and then (and only then), sew the bottom of the pocket together. 

Saturday 3 September 2016

Bali Batik Bliss BOM

Way back in March I won the Block of the Month (BOM) at Capital Quilters.  It was the first time I'd won so I was excited to do something with the blocks.


I wanted to be a bit adventurous and not just do the obvious thing of joining the blocks up in a grid.  I've admired the quilts Jill Fisher (Pie Lady Quilts) makes for some time.  She has a unique style and makes unique quilts in bright colours, with bold geometric designs.  Jill also loves improv and is not bound by 90 degree angles.

The blocks were all about 10" square

So I was brave and started to cut the 10" square blocks into smaller squares and rectangles. I bought 2.5 metres of a bright blue batik to use as the sashing. I chose blue because it looked like the sea, and it worked well with all the bright colours in the blocks.  A lot of batiks come from Indonesia, which is a country made up of many small islands sitting between the Indian and Pacific Oceans. Bali is a popular holiday destination in Indonesia - hence the name Bali Batik Bliss.


I know I've still got a long way to go to make a quilt as effective as Jill's, but this is my first step on that path.  I don't know how I'll quilt it yet, but I won't be hand quilting it because I don't like hand quilting batiks (the thread count is very high and it's hard to pull the needle through the fabric - especially with the thicker threads I like).

The top measures about 70" x 80".

Now I'm ready to win my next set of blocks at Capital Quilters!