
Here are some progress photos, and some tips and tricks if you'd like to make this quilt. Patterns and kits are available from shops that stock Anna Maria Horner's fabrics.
1. The central Dresden Plate block.
I love it! This is going to make a very dramatic central block in the quilt.

 |
| I taped the template onto my ruler |
I made a plastic template for the wedges and was very careful with how I cut the Dresden Lace fabric. The teal pieces look great when they are fussy cut.

I chose to hand applique my Dresden Plate onto the background fabrics, but you could use any method of applique. I ran a tacking thread around the centre to hold the fins in place before I machine appliqued the central motif on.


I thought I had it all under control, but then I accidentally picked up my 12.5" ruler and cut the block too small!

Fortunately I could pattern match two pieces and recover from that mistake, but it made me quite nervous about cutting the "On My Way" fabric into 12 large blocks. So, I did lots of planning on paper first. I also used the blocks I'd already cut from the "Beautiful Mushrooms" to help with planning.


I even tested out my cutting on pieces of paper!


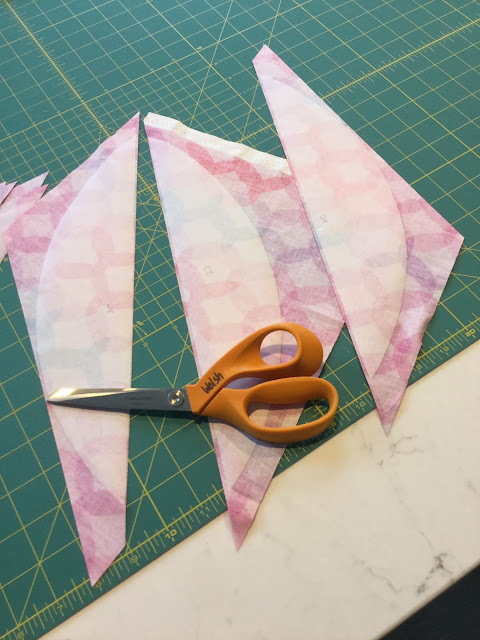
Once I had cut the diagonal strips, I could decide where to make the opposite cuts to get a good mix of motifs in my blocks, and centre flowers, birds, people where possible.


I made a plastic template for the crescents and traced around it onto the Vlisofix. Because I chose to use raw edge applique, I removed the seam allowance on the curved side, but retained it on the straight side. I cut out each Vlisofix crescent and laid them on the bias of the fabric - as per the pattern.

After I'd ironed the Vlisofix crescents onto the fabric, I sliced the pieces apart with my rotary cutter, and then cut around the curved edges with scissors.
Before I applied any crescents to the "On My Way" blocks, I was very careful to get the direction of the prints on the blocks correct. I laid out all 12 blocks on my bench, ensuring I had a good spread of the motifs in the fabric.

I then fused the "Bokeh" crescents on to the correct edge of all 12 pieces on "On My Way" before I fused on any of the "Tokyo Dreams" crescents. That saved me from getting any blocks up the wrong way.
I then machine appliqued the crescents on to the blocks using blanket stitch 1329 on my Bernina. I used the open toe foot. I set the stitch width to 3 and the stitch length to 3. I positioned the need to the far right, and lowered the pressure to 25. I also set the stop needle position to the right.


The corners on these blocks are a little bit tricky. I thought I could get away without making the plastic templates, but life became easier when I gave in and made the templates. I'll talk more about these blocks in a future post.


So, that's where I'm up to with the Portraits quilt. If you have any questions feel free to email me.
Here's a list of where Anna Maria Horner will be teaching in NZ.Hosted by Fabco, Anna Maria will be teaching and lecturing around New Zealand for the first time. Contact the following shops to book your time with her! The shops are starting to release details of the lectures and classes now.
November 19-20 - All Things Patchwork, Auckland
November 21- Cottage Flair, Rotorua
November 22-23- Donna’s Quilt Studio, Hamilton
November 25-26- Busy Bee, Wellington
November 27-28- Quilter’s Lane, Masterton
November 29-30- Quilting Shed, Oamaru

 |
| The fussy cut central circle. |
2. The large outer blocks.

2.1 Cutting large blocks on point.
The pattern requires 4 large blocks from the "Beautiful Mushrooms" print.


I thought I had it all under control, but then I accidentally picked up my 12.5" ruler and cut the block too small!

Fortunately I could pattern match two pieces and recover from that mistake, but it made me quite nervous about cutting the "On My Way" fabric into 12 large blocks. So, I did lots of planning on paper first. I also used the blocks I'd already cut from the "Beautiful Mushrooms" to help with planning.


I even tested out my cutting on pieces of paper!


Once I had cut the diagonal strips, I could decide where to make the opposite cuts to get a good mix of motifs in my blocks, and centre flowers, birds, people where possible.


I do like a challenge, but I must admit that I breathed a sigh of relief when I had all 12 blocks cut out.
2.2 Making and applying the crescents
When I first saw the Portraits quilt pattern I thought that the large blocks would require curved piecing. However, when I read the instructions I realised the crescents are appliqued on. I haven't done a lot of raw edge machine applique, but I upskilled quickly. It's quite easy if you use Vlisofix and keep your machine speed very slow.
I made a plastic template for the crescents and traced around it onto the Vlisofix. Because I chose to use raw edge applique, I removed the seam allowance on the curved side, but retained it on the straight side. I cut out each Vlisofix crescent and laid them on the bias of the fabric - as per the pattern.

After I'd ironed the Vlisofix crescents onto the fabric, I sliced the pieces apart with my rotary cutter, and then cut around the curved edges with scissors.

Before I applied any crescents to the "On My Way" blocks, I was very careful to get the direction of the prints on the blocks correct. I laid out all 12 blocks on my bench, ensuring I had a good spread of the motifs in the fabric.

I then fused the "Bokeh" crescents on to the correct edge of all 12 pieces on "On My Way" before I fused on any of the "Tokyo Dreams" crescents. That saved me from getting any blocks up the wrong way.
 |
| Bokeh - iron one of these pieces to each of the 12 blocks FIRST |
 |
| Then add 3 crescents of Bokeh to each of the 12 blocks |

3. The inner blocks
Aren't these so pretty! I love how these fabrics work so well together.


The corners on these blocks are a little bit tricky. I thought I could get away without making the plastic templates, but life became easier when I gave in and made the templates. I'll talk more about these blocks in a future post.
4. The side setting triangles
I'll also talk more about the side setting triangles in a future post, but suffice to say that I fussy cut the Propagate fabric and it looks great.

So, that's where I'm up to with the Portraits quilt. If you have any questions feel free to email me.
Here's a list of where Anna Maria Horner will be teaching in NZ.Hosted by Fabco, Anna Maria will be teaching and lecturing around New Zealand for the first time. Contact the following shops to book your time with her! The shops are starting to release details of the lectures and classes now.
November 19-20 - All Things Patchwork, Auckland
November 21- Cottage Flair, Rotorua
November 22-23- Donna’s Quilt Studio, Hamilton
November 25-26- Busy Bee, Wellington
November 27-28- Quilter’s Lane, Masterton
November 29-30- Quilting Shed, Oamaru
7 comments:
So good to see all the steps so far and your methods for cutting certain pieces. I bought this pattern last week and felt very tempted to get a hold of the fabric but then hesitated at the finished size. My husband loved the cover with the photo of the quilt, so I'm not very tempted indeed and think I'll have to go check the yardage requirements.
Wow that's one intricate quilt. It is very beautiful!
It's sure an honor for you to be invited to make Anna Marie's design, and you're sure going to a lot of effort to fussy-cut the pieces. It looks like a lot of work to me! I hope you're enjoying the process, and that you have a great time when she visits NZ.
This is going to be beautiful! Love seeing it start to come together.:)
Beautiful...you did a wonderful job
Amazing job Wendy. Do the fabric requirements for this quilt give you enough to fussy cut as you have done? Our shop just got the remaining two lines in so i might have to stock up. Thanks for your post.
Yes, the fabric requirements are generous, and do allow for fussy cutting.
Post a Comment