Showing posts with label AMH conservatory. Show all posts

Friday, 5 May 2023

Mariner's Compass

On Monday I went to a class with visiting Australian tutor, Chris Jurd.  We spent the day making one big 18" Mariner's Compass block.


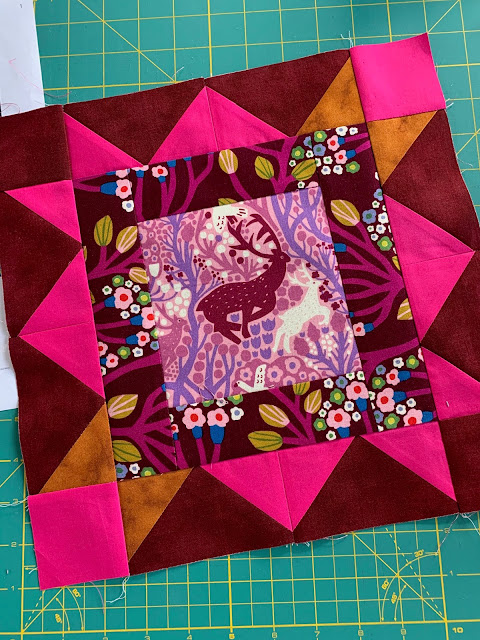
I'm really pleased with how my block turned out, especially as I made it all from stash!!  I didn't have enough of my favourite green for the background, so Chris encouraged me to alternate it with another green and it's worked out well. 


The fabrics I used were all left over from my Endless Lockdown quilt made back in 2020. The kit I had purchased was very generous with the fabrics, so I could make more Mariner's Compass blocks with different animal centres if I wish.  The fabric was designed by Monika Fosberg for Anna Maria Horner's Conservatory Craft.


Here's some finished examples Chris showed us at the class.  I'm not sure how I'm going to finish my block yet, or if I'm going to make more to make something bigger.  


Now it's time for the Peacock Party.  Feel free to link up a recent blog post below. 


You are invited to the Inlinkz link party!

Click here to enter

Friday, 22 May 2020

Endless Lockdown

Look at this! It's a finished quilt!


This is the Endless Summer pattern by Anna Maria Horner. But I've decided to call my version Endless Lockdown to reflect the fact that I made it during the COVID-19 lockdown of March/April/May 2020.

I first saw this quilt when Anna Maria came to New Zealand in November last year.  It was one of the quilts Anna Maria showed during her trunk show.  I just loved the quirky images and the way that they were used in the quilt, so I bought the kit as a Christmas present to myself.


At Easter I decided that I needed something substantial to get my teeth into, so I cracked open the kit and started to make this quilt.  I worked on it every day for the next three weeks and loved every minute of it.


The quilt is 64" x 64" so I thought I might have something that would work for the backing.  I found a big piece of Libs Elliott skulls fabric in purple that was almost big enough.  I fussy cut some of the leftover fabrics and made a strip to make the backing big enough.


The back looks almost as good as the front

I've got a backlog of quilts to be hand quilted, so I decided to get this quilt quilted by a local long arm quilter, Rayna Clinton of Tui Song Quilting at Wainuiomata.  I know Rayna through our guild, and I've been impressed with her quilting on other people's quilts.

As soon as we were free to leave our homes, I went to see Rayna and we discussed patterns and thread colours for my quilt.  A week later my quilt was finished and ready to pick up.  I asked Rayna to  baste a couple of other quilts at the same time, so my hand quilting pile now has grown even bigger!


So my quilt is finished - quilted, bound, washed and ready to keep my knees warm on winter nights. I'm really happy with how it's turned out.


I've included a link at the top to Anna Maria Horner's website, but a word of warning - be very careful ordering any quilting supplies from outside your home country at the moment.  I know people in Australia, New Zealand and Europe who are all waiting for items to ship from USA at the moment. I'm sure there are problems with freight going the other way too, so just try to order locally if at all possible to avoid disappointment.


Now it's time for the Peacock Party.  Feel free to link up a recent blog post and let us know what you've been working on.

You are invited to the Inlinkz link party!
Click here to enter


Friday, 27 December 2019

Merry Christmas and Happy New Year

2019 is almost over.  I hope you all had a very Merry Christmas with family and friends.  We certainly did here.


I cleared my sewing table in the family room and we put the presents on the table, rather than under the tree this year.


I got 3 new Mill Hill Santas to join the one I've already made.  I love making these little decorations and they look so good on the tree.  Here are some other Mill Hill kits I've made in previous years.


I gave mum some of the new Land Art fabric by Odile Bailloeul to make a Catch All Caddy by Patterns by Annie.  Later today we will find some soft and stable in my stash and mum will be ready to start when she gets back to her house in Auckland.


I received the wonderful Endless Summer quilt kit by Anna Maria Horner.  I just loved this quilt when I saw it in real life during Anna Maria Horner's trunk show in Wellington.  When I saw The Patchwork Pear in Australia advertising the kit, I ordered it for myself for Christmas.


I love those framed images that Monika Forsberg has created in this fabric.

I hope you all received lovely gifts too.  Feel free to link up to the Peacock Party and share how your Christmas Day went.


You are invited to the Inlinkz link party!
Click here to enter


Friday, 27 September 2019

Portraits Quilts (and the Peacock Party)

Here it is, in all its beauty - the Portraits quilt that I made for Anna Maria Horner. 


Donna Ward from Hamilton did the amazing quilting. Thank you Donna! 


In case you've forgotten, back in April Anna Maria Horner asked if I would like to make this quilt to help promote her upcoming tour of New Zealand. 

I jumped at the chance, and I've really enjoyed working with the gorgeous fabrics that make up the Conservatory Chapter 2 range. 


You can read my earlier posts about making this quilt here:
unwrapping the fabrics
fussy cutting the fabrics
piecing the blocks


I used another Anna Maria Horner print on the back

When it was finished I decided that I really did need to block it to ensure it was square.  I washed it in cold water, and then pinned it out on these play mats that I keep especially for this purpose. 


When it dried it was perfectly square. 


Finished size: 66" x 85"

I love the finished quilt, and I am so thrilled that Anna Maria Horner invited me to make it and share my experiences on my blog.

If you haven't got a ticket for Anna Maria's lecture or classes yet, you better move quickly.   I really encourage you to attend a class or lecture if at all possible.  It's sure to be inspirational.  Here are the dates and venues:

Hosted by Fabco, Anna Maria will be teaching and lecturing around New Zealand for the first time. Contact the following shops to book your time with her! The shops have all released details of the lectures and classes now.

November 19-20 - All Things Patchwork, Auckland
November 21- Cottage Flair, Rotorua
November 22-23- Donna’s Quilt Studio, Hamilton 
November 25-26- Busy Bee, Wellington
November 27-28- Quilter’s Lane, Masterton 
November 29-30- Quilting Shed, Oamaru


Now it's time for you to share what you've been working on this week.  Feel free to link up a recent blog post below.

You are invited to the Inlinkz link party!
Click here to enter

Sunday, 11 August 2019

Portraits Quilts for Anna Maria Horner - Part 2

This weekend I sewed the final seams on the Portraits Quilt designed by Anna Maria Horner.  Yay!!!!


I can guess what you're thinking - it's BIG! And yes, it is big.  Finished size will be 71" x 89", or 180cm x 226cm. 

The pattern for the stunning Portraits quilt is now available to purchase from shops that carry the Conservatory fabric line.  You can find a list of them here on the Free Spirit Fabrics website. This pattern combines fabrics from all three of the designers who contributed to Chapter 2 of Conservatory fabrics - Anna Maria Horner, Nathalie Lete and Courtney Cerruti.


Now that I've finished piecing the top, I can share a few tips about my experience making this top.  I wrote my first blog post with tips a few months ago and you can read it here.  It covered the central Dresden plate block and the large outer blocks. I said at the time that I'd write more about the inner blocks and side setting triangles, so I'll do that now.

3. The inner blocks


I love the colours in these blocks.  They are so vibrant, and combine so many fabrics I might not ordinarily put together.  I've just done the maths and there are 49 pieces in each block!!! Wow,  no wonder it took time to make them all precisely.

It's important to make the templates for these blocks.  I tried to do it without templates, but I struggled so quickly gave in and made the templates.  It's so much easier with templates made from template plastic.  Copy all the markings from the instructions, and label your templates.


It's easier to trace around templates if you work on fine sand paper.  I trace the lines, and then use scissors to cut the shapes.  I don't like using a rotary cutter with skinny template plastic.


The diamond template needs to be flipped over to get half the shapes reversed.  Keep the pieces in neat piles because the pieces are not symmetrical and shouldn't be mixed up.


I drew my own picture of how the blocks were to be assembled.  I then stacked my pieces on each side and kept them separate.


Once the orange triangles had been sewn on, I attached the dark corners, again referring to my own drawings so I didn't get muddled up.


When it's time to join the two sections, it's important to match the seams half way down the block.


I tried to match all the seams in each block, but with 49 pieces it was a little tricky.  The black diamonds stand out, so it's important to try and get their point to meet if at all possible.  In the end, it's your quilt, and as long as you're happy with what you've done, it will be great.  There's so much going on in this quilt, no one is going to study every single join.


4.  The side setting triangles


I fussy cut the Propagate fabric and it looks amazing.  Although this fabric is only two colours, it might just be my favourite in the quilt.
The pattern allows enough fabric for fussy cutting, so do fussy cut if at all possible.  This way the pattern will be centered on the side setting triangles.


I placed the Buttercup side triangles onto the Propagate fabric to determine where to cut.


This helped me to get the Propagate fabric centered.  Beware, Propagate is not perfectly symmetrical, but this method helped me to centre the design.


5.  The corner triangles


The early version of the pattern said to cut the corner triangles from a 13" square.  That really needs to be a 13.5" square because the adjoining block is 13" square.  Hopefully that's been updated in the pattern, but do be sure that you're cutting the triangles from a 13.5" square.

Don't end up like this with your corner pieces too small.


So, that's all my tips and tricks for making the Portraits quilt.

The next step is the quilting.  I'm still deciding if I'll hand quilt it myself or not.  The appliqued crescents are affixed with vlisofix, and I can't hand quilt through that, so maybe it will be a combination of hand and long arm quilting.  I would like to have some hand quilting on it, because I know that Anna Maria Horner is a hand quilting fan herself.


There are so many colours in the quilt it's hard to know where to begin!  I pulled out my Aurifil colour card and had a go at matching some colours.


It's been a real honour to make this quilt for Anna Maria Horner.  Her visit to NZ is getting closer and I'm getting excited to meet her in real life and take a class with her.  I really encourage you to attend a class or lecture if at all possible.  It's sure to be inspirational.  

Hosted by Fabco, Anna Maria will be teaching and lecturing around New Zealand for the first time. Contact the following shops to book your time with her! The shops have all released details of the lectures and classes now.

November 19-20 - All Things Patchwork, Auckland
November 21- Cottage Flair, Rotorua
November 22-23- Donna’s Quilt Studio, Hamilton - the class is FULL
November 25-26- Busy Bee, Wellington
November 27-28- Quilter’s Lane, Masterton - only 4 spaces left in the class
November 29-30- Quilting Shed, Oamaru