Showing posts with label epic millefiori. Show all posts

Friday, 25 February 2022

Bollywood

I'm pleased to present "Bollywood" - another finished quilt from Millefiori Quilts 4 by Willyne Hammerstein. 


I love the vibrant colours in this quilt.  I started with a piece of the Legendary fabric by Pat Bravo as my inspiration fabric, and chose the other fabrics from that.  The hot pinks, the rich golds, and the sparkling teals.  I love them all together in this fabric.  


Bollywood is made from the Raindrops Are Falling on my Head pattern that is in Millefiori Quilts 4 by Willyne Hammerstein.  I chose to hand piece my quilt, but it can also be paper pieced.  I used templates made by Paper Pieces in USA, and fussy cut as many rosettes as I could. 


You can read my earlier posts about my Bollywood quilt here:

Just starting out - March 2021

Making progress - June 2021

I love hand quilting, but a quilt like this has a lot of seams, so I took it to my local long arm quilter - Rayna Clinton.  We developed a plan, and she quilted it beautifully on her long arm machine.  


I decided to use up all my scraps from this quilt on the back.  I now have a permanent record of what the Legendary fabric looked like before I fussy cut it to death.  


Bollywood isn't huge, but it was fun to make and allowed me to experiment with pattern and colour.  I'm making another version of this pattern with minor changes this time.  You can read about my Ruby Star quilt here, and I'll point out the differences in a future post.  

Finished size: 40" x 55"

Now it's time for the Peacock Party.  Feel free to link up a recent blog post below. 


You are invited to the Inlinkz link party!

Click here to enter

Friday, 20 August 2021

Ballet with Kaffe = Fireworks

Everyone loves a good fireworks display, so I've decided to call my Ballet with Kaffe quilt, "Fireworks".

Fireworks by Wendy Welsh

I'm so pleased that this quilt is finished.  I love it, but it did take me a few years from start to finish. There were times when I thought I might never finish it. In the end I drew a line on my pattern and decided to stop piecing at that line.


I started this quilt in June 2017, and I finished it in February 2021.  That's almost four years!!!

The Cotton + Steel floral fabric on the left of the photo below was my inspiration fabric.  I didn't use it in the body of the quilt, but I based all of my fabric selections on it, because I love the way that those colours work together.  I used it in the borders of the quilt, and I managed to secure enough to use it on the back too. 


Sharon Burgess of Lilabelle Lane, Willyne Hammerstein and me - AQC in Melbourne 2018

Along the way I attended a class with Willyne Hammerstein at the Australian Quilt Convention (AQC) in Melbourne.  Willyne made hand piecing look so easy, but I'd already started English Paper Piecing (EPP) my Ballet quilt, and I didn't want to mix the methods, so I persevered with EPP. 

At the Great NZ Quilt Show in Rotorua May 2021

I finished the English Paper Piecing in January 2020, and then in April 2020 I added the fancy borders, inspired by the borders around Willyne's Moncarapacho quilt from Book 3, pictured below. 

Moncarapacho designed and made by Willyne Hammerstein

I do love hand quilting, and I wanted this quilt to be all my own work, so I hand quilted it with Aurifil 28wt in a range of different colours.  I enjoyed revisiting all the fabrics in my quilt as I hand quilted it.


You can read all of my previous posts about this quilt on the Ballet with Kaffe Fassett tab at the top of my blog, or by clicking here.  

I was going to say: IF you live in Wellington, and IF we're back at Level 1 by next Saturday 28 August, you can come and see it in person at Capital Quilters guild meeting.  But that's looking very unlikely now. I think we will have to reschedule my talk to Capital Quilters. 
Or maybe you could see it at Rose City Quilters on 25 October 2021. 

Finished size: 60"w x 66"h


Now it's time for the Peacock Party.  Feel free to link up a recent blog post below. 


You are invited to the Inlinkz link party!

Click here to enter

Friday, 4 September 2020

La Passacaglia - a trip down memory lane

 This week I've been reminded about the fun I had making my la Passacaglia quilt.  


Tula Pink did a little video earlier this week about her la Passacaglia quilt, and it got me thinking about mine again.  You can watch Tula's video about her quilt here: 

https://www.facebook.com/tulapink/videos/309154120366478/


I still love my quilt, and I use it on our bed sometimes.  I also take it to show other quilters when I get invited to speak at other guilds.  

It wasn't Tula Pink that inspired me to start my quilt, but rather two other quilters that I stumbled across online.  One of them was Sharon of Lilabelle Lane Creations in Australia.  Sharon is a big Tula fan, and she was inspired to make her own la Passacaglia after seeing photos of Tula's la Passacaglia.    

I got to meet Sharon and Willyne Hammerstein in Melbourne, Australia back in 2018.  It was lovely to all meet up at AQC. 

I started planning my la Passacaglia quilt back in late 2014.  I got the Millefiori Quilts book by Willyne Hammerstien for Christmas in 2014, and I immediately launched into it. 

I chose Kaffe Fasset's Millefiori fabric in blue as my inspiration fabric, and from that I chose these fabrics as my starting point.  


As you can see from my finished quilt, I didn't use all of these fabrics, and I introduced plenty of other fabrics.  I just let the colour scheme evolve as I went along.  The most important thing was balance, so if it needed more green or yellow, I added more green or yellow.  


It took just on one year for me to finish English Paper Piecing my quilt top.  I was thrilled when it was all joined up and I could finally hold it up. 

I wanted borders, and fortunately I had seen some wonderful border fabric, so I tracked it down and very carefully applied my borders.  You can read about how I added my borders, and all other aspects of my quilt, on the la Passacaglia tab at the top of my blog.  

While I was making my quilt my mum got interested too, so she made her very own version of la passacaglia.  

It was fun comparing progress when we met up.


Mum's quilt was one of the ones selected to go to Houston for the QuiltMania exhibition.  It hung with 19 other quilts, including Tula Pink's enlarged version.  And then mum's quilt was selected to go on to another exhibition in Nantes, France too!

My quilt wasn't selected to go to Houston, but I was super thrilled when it won the top amateur award at the QuiltNSW Sydney Quilt Show in 2017. I think that award was even better than it going to Houston, because the quilts weren't judged in Houston - they were for exhibition only.  In Sydney I was surrounded by friends, both from NZ and Australia, and I had the most wonderful time with so many people congratulating me and telling me they loved my quilt. 


Thanks to Tula Pink finding Willyne's book and making her la Passacaglia quilt, Millefiori Quilts has become very popular and Willyne has now written four books.  I own them all and have lots of plans for more quilts yet.  

Although Willyne hand pieces all her quilts, you can hand piece or English Paper Piece these designs.  They're all wonderful.  I encourage you to find a book and take a look. 


Now it's time for the Peacock Party.  Feel free to link up a recent blog post below.  


You are invited to the Inlinkz link party!

Click here to enter

Monday, 19 September 2016

la passacaglia - it's finished!!

Yes, it's true.  My la passacaglia quilt is finished and I'm really thrilled with it. I love how all the Kaffe Fassett fabrics provide so much colour and interest.


I started this quilt way back at Christmas 2014, after carefully considering if I could really hand sew a big quilt like this.  I decided to take the plunge, and I'm very glad I did because I've really enjoyed the process, and learnt a lot about colour and pattern.


I chose to English Paper Piece (EPP) my quilt, and this experience has certainly improved my EPP skills.  I'm not afraid to tckle anything that requires EPP now.


I always knew I would hand quilt my la passacaglia because I thought if I was going to hand piece a quilt in a traditional manner, I would hand quilt in a traditional manner too.


You can find links to all my previous posts about this quilt on my la passacaglia / Millefiori tab at the top of the page, or by clicking here . Those posts include:
- how to get started on a quilt like this
- Glue basting vs thread basting
- thread selection
- attaching the borders
- hand quilting


I'm not quite sure where I'm going to put this quilt yet, but it's already got a hanging sleeve on the back, so I just need to find a clear wall space out of the sun.

Thank you for all the support I've received while making this quilt - from my blog followers and readers, the Millefiori/la passacaglia Facebook group, and on Instagram. You've all kept me returning to this quilt when I've drifted off to other things. Thank you.

And yes, I am already thinking about my next millefiori quilt. I already have the templates and paper pieces for Ballet Avec Kaffe Fassett from Willyne's second book - Millefiori Quilts 2. But I know she's working on a third book so I better get a wriggle on.


Finished size - 68" x 77" (173 cm x 196 cm)


PS I did enter my quilt in QuiltMania's competition, but my quilt wasn't one of those chosen by the publishers to hang at the International Quilt Festival in Houston this year. I'm thrilled that my mum's quilt was chosen though, and look forward to seeing photos of it there.

mum's top before she hand quilted it

Friday, 29 January 2016

la passacaglia has borders now

In the never ending story of my la passacaglia, it now has all four borders on it and is ready to be turned into a quilt sandwich for hand quilting.


My good friends Connie and Rick at The Kings Fancy rushed me two more yards of the border fabric because I had miscalculated.  That certainly won't ever happen again!!

I used Effervescence by Amelia Caruso for Robert Kaufman for my borders and it works perfectly for my quilt.


It's Friday here today, and tomorrow is my Kaffe Fasset class in Wellington, NZ.  I'm taking this quilt to show Kaffe and Brandon because it contains many Kaffe Fasset fabrics.  Yesterday I counted 19 different fabrics from their range, and I've used many of them more than once.

You can read all my other posts about la passacaglia on the tab at the top of the page.


Monday, 18 January 2016

la Passacaglia - how I attached my borders

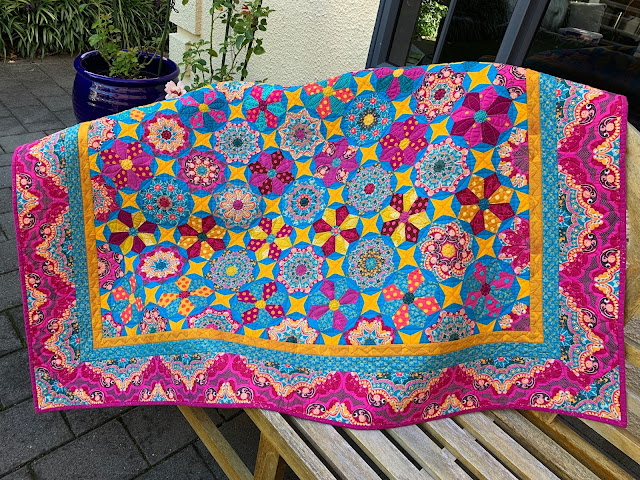
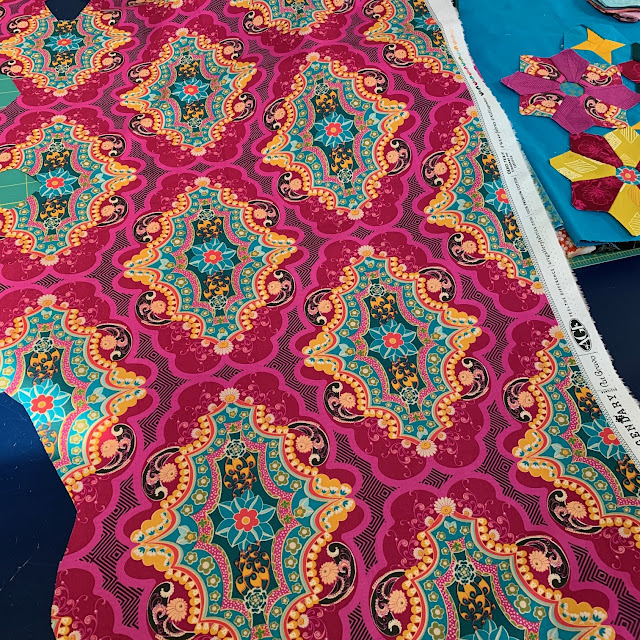
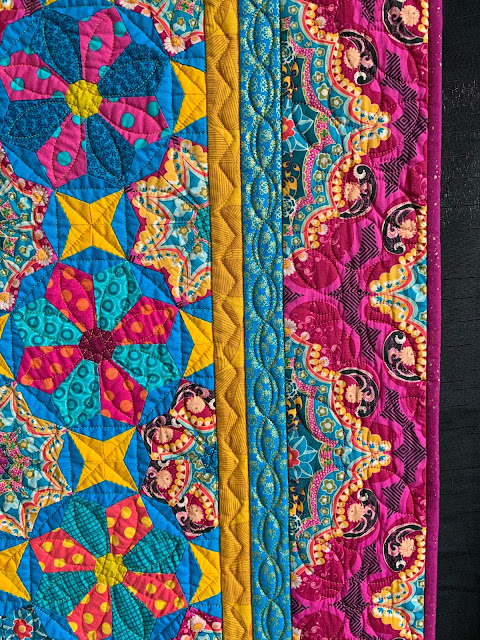
I always knew that I wanted to attach straight borders to my la passacaglia. My thinking was that it frames the design, and makes you feel that you are getting a sneak peek at a bigger overall pattern.   Fortunately I stumbled across the perfect border fabric back in September. My quilt was already 50% complete by then, but the fabric worked with it so well.

The border fabric is Effervescence by Amelia Caruso for Robert Kaufman.  I chose the Caribbean colour way, and I purchased it from The King's Fancy on etsy USA. They stock all the colour ways.


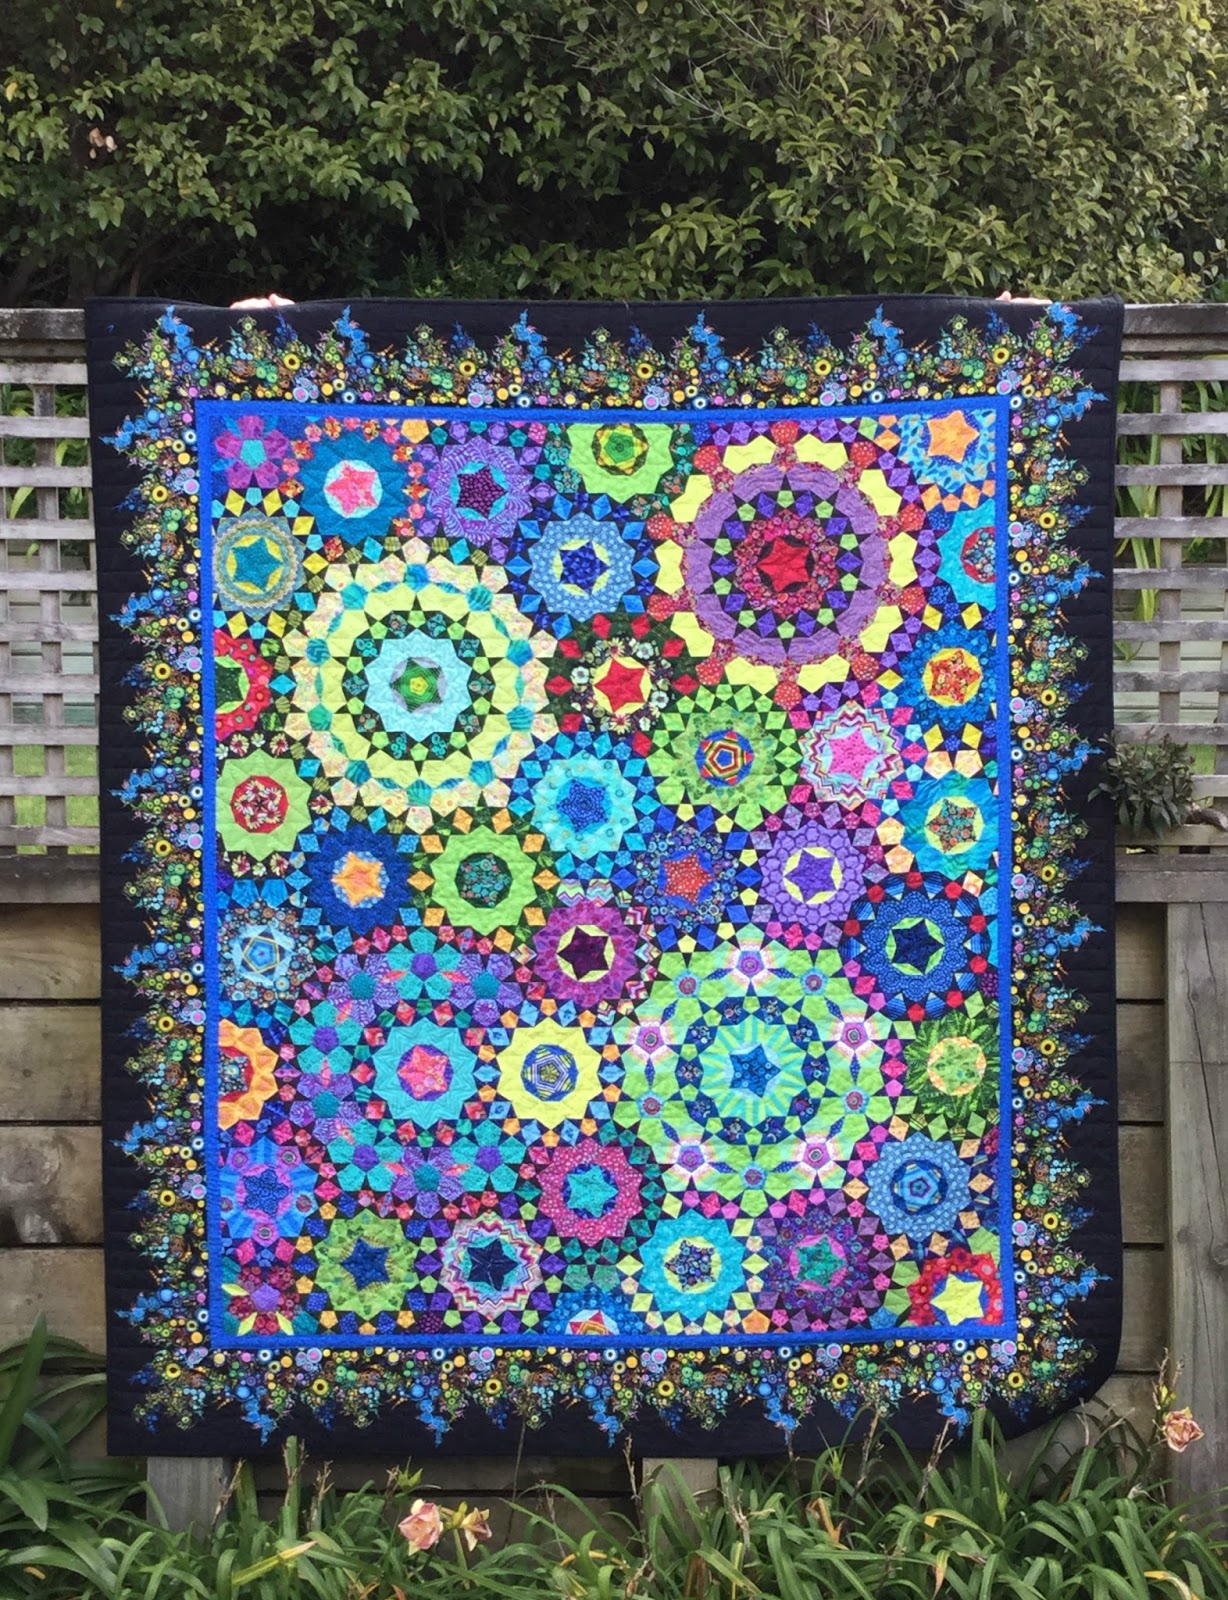
As I was assembling my rosettes I drew a cutoff line on my pattern.  I wanted my quilt to be slightly larger than the one in the pattern to show more complete rosettes.  Mine ended up at 54" x 64" before I added the borders.

I was careful not to sew beyond that line because I didn't waste time attaching stars which were then going to be cut off. As a result my quilt had fairly straight edges.  The sides are harder to align than the top and bottom, but I kept to my plan.

Checking the straight edge with a tape measure

You can see how my sides are reasonably straight

A number of people have asked me to document how I attached my borders, so here is a step by step guide.  Please bear in mind that this is just what worked for me.

1. I wanted a skinny blue strip before my fancy border, so I joined the blue strips together first, and then sewed them to the fancy border. That meant I only had to attach one big border to the quilt. I cut my first border, leaving quite a bit over overhang because I wanted to miter the corners.  There are a variety of methods for mitering corners, but my quilt was quite stretchy so I didn't want to cut the 45 degree angle until I had the borders on.  It would be terrible if the border was too short.


2. I left the very edge row of paper pieces in the quilt while I attached the borders. I pinned the border along the straight edge I had drawn on my pattern. I used a walking foot and sewed right through the paper pieces.  The seam line is 1/4" inside the line on the pattern, but that's fine.

the paper pieces are still in the edge row of pieces

3. I then checked the border, and once I was happy I trimmed back to a 1/4" seam allowance - right through the paper pieces and all.

trimming off the excess with an old rotary cutter

4. I then mitered the corner, which I'm not going to explain here sorry.  I suggest you google it until you find a method you are comfortable with.  I'm not great at explaining and don't want to put anyone wrong.

ready to miter the corners

5. I then removed the paper pieces very carefully.  The edge paper pieces had been sewn through, so they had to come out in two parts, and could not be used again. Tweezers helped to get the tiny bits out.


And here's the final result.


I thought about pattern matching the fabric at the corners, but I've since had it pointed out to me that I couldn't because the pattern is not symmetrical.  That makes me feel relieved, because I don't usually like to take the easy way out. Instead I've just tried to make the corner patterns relatively similar so they look good together.

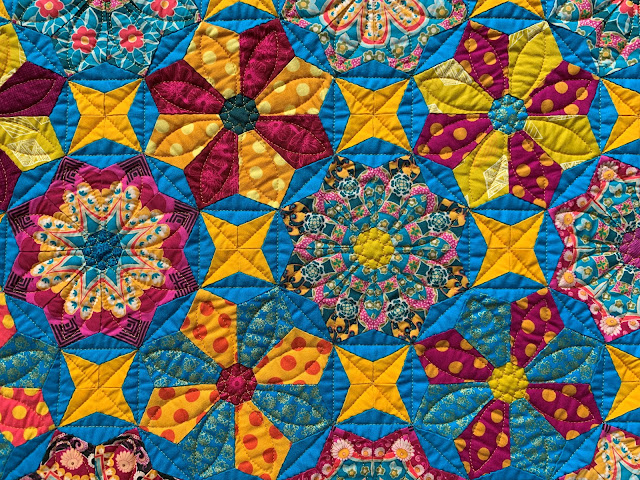
You've probably noticed that I haven't really ironed my quilt. It would be impossible to iron all those seam allowances beautifully, and a number of people quote Jinny Beyer as once saying "just iron it flat, don't worry about the seam allowances on English paper pieced quilts".  I don't really know whether Jinny said that or not, but it works for me.  Some of those pieces have been wrapped around paper pieces for a year, so they hardly even need ironing, though I will give a quick press before I baste it for quilting.

The stats:
1. my quilt was 54" x 64" before I added the borders.  I made mine slightly larger than the pattern in the book.

2.  I purchased 10 yards of the border fabric to get enough of the fancy border to go around my quilt.  However, please do not rely on my measurements - you must do your own calculations.

3.  I expect it to be approx 72" x 82" once the borders are on.

I hope this helps.  It's hard to explain all this in writing - it would be much easier face to face. I'm off to tackle three more mitered corners now, and then the hand quilting in the months to come.

There's more information about how I made this quilt on the la passacaglia - Millefiori Quilts tab at the top of the page (including links to all my previous posts).


Thursday, 14 January 2016

My la passacaglia top is finished

Today was a very special day.  I finished the hand piecing on my la passacaglia quilt.  I'm so pleased with how it's turned out.  I can honestly say that I wouldn't change anything about it.  I love the colours and the fabrics, and I'm excited to quilt it in the weeks ahead.

January 2016

I first became aware of la passacaglia back in October 2014.  I was immediately drawn to the pattern because I love intricate, clever quilt designs.  As soon as I realised it was all hand stitched, I knew it would be a big undertaking, and I wondered if I'd be able to do it.  I had done some English Paper Piecing before, but I knew that I wouldn't be able to hand baste all those tiny pieces and then sew them together.  I've got a mild form of Rheumatoid Arthritis and my hands get very stiff and sore in the winter.  Fortunately I discovered glue basting during my research, and I love it.  Glue basting has saved my hands and enabled me to complete my quilt.


I started my quilt on 1 January 2015, and finished the hand piecing on 14 January 2016.  That's one year and two weeks that I've been working on it.  Of course, there have been periods where I've put it aside and worked on other things.  For the first six months I just made rosettes in all my favourite colours without adding any stars to them.

May 2015

I wanted to plan my layout before I added stars to the rosettes. Each rosette has a different number of stars, depending on where you place it in the design.

In August 2015 Shirley Mooney and I agreed to speak about this quilt to our quilt guild.  That commitment gave me the push I needed to start joining up the rosettes. I thought it would be nicer to show them a section of the quilt, rather than just 25 loose rosettes.

September 2015

Then we were asked to speak at another guild in November 2015, so I made another big effort to add a few more rosettes.

October 2015

Now Kaffe Fassett is coming to teach in Wellington in January 2016 and I would love to show Kaffe and Brandon my finished quilt top.  It has at least 20 of their fabrics in it and I think they would like it.

January 2016

I guess my advice to people making this quilt would be:
1.  accept that it's a long term project and allow about one year
2.  spend as much time as you need planning, because then there's less unpicking required
3.  set a few milestone dates to work towards - they provide good motivation
4.  join the Millefiore/la passacaglia facebook group.  We have nearly 5,000 members and there's so much support available from people all over the world.

I've already sorted my border fabric and I'll add the borders at the weekend.  Then it's straight into the hand quilting.  I don't really have a plan yet, I'll just see what works.

border fabric is Effervescence by Amelia Caruso for Robert Kaufman

There's more information about how I made this quilt on the la passacaglia - Millefiori Quilts tab at the top of the page (including links to all my previous posts).

I've been working almost exclusively on this quilt for about 6 weeks now.  I feel strangely free tonight - like that feeling you have when your exams are finally over.  I can work on whatever I like now.  When I look back at all the hours I spent pondering fabric choices in 2015, I think I'm going to be so much more productive in 2016.  The decisions for this quilt really did take longer than for any other quilt I've ever made, but I'm very happy with the outcome.  It was all time well spent.