Pages

Thursday, 30 January 2014

Bargello Cushions


Bargello Cushion 1
Wow, I'm been so busy visiting other peoples' blogs and answering all the lovely comments left on my blog, that I haven't had time to write any new posts for a while. I'm very grateful to Vicki from 2 bags full  for organising this blog hop. It's a great way to see what other people are making and blogging about.

I made these bargello cushions in a class at Nancy's Embroidery Shop in Wellington, New Zealand. The instructor's cushion was rather more free form than mine, but I like straight lines and segmentation, so I came up with the designs that you see.

Bargello cushion 2
I initially thought that bargello was rather dated, because most of the work I'd seen was done in olive geens, browns and oranges from the 1970s and 80s. Of course I didn't want to use those colours, so I opted for blues, greens and pinks. The secret to good bargello is to have three or four shades of the same colour and then you will get the shading effects you can see in my cushions. I used dark navy canvas and Perle 5 for these cushions.

For my first cushion I divided the space into nine equal squares and then chose a pattern to fill each square. I used a bargello book (The Bargello Book by Frances Salter) and selected the designs that I liked the best.


I used graph paper to map out the designs and check that I was going to see the pattern repeating enough times within the squares. The tumbling block pattern appealed of course, because it's also used in quilting.


For the second cushion I used parts of a pattern that I'd seen in another bargello book. It might have been 
Bargello : a fresh approach to Florentine embroidery by Brenda Day but I can't be sure now.


I put a different pattern on each side of the main panel, and sneakily incorporated one square of the wave pattern into the grid cushion so there would be a linkage between them.


I make sure that these cushions are looked after because they did take a lot of time to make. Teenage boys have a habit of throwing cushions on the floor, so these cushions live beside my chair and are for my use only!

Bargello cushions


Saturday, 25 January 2014

Grow Your Blog 2014 and Giveaway

This is a special blog post for Grow Your Blog 2014.

Hello, and welcome to my blog. Thanks for dropping by. My name is Wendy and I live in Wellington, New Zealand. I'm in my 40's, happily married with two teenage sons. I'm an accountant, but fortunately I only work part time at the moment. so I have plenty of time for sewing. I've gained a lot of inspiration from reading other people's blogs and seeing what they are working on, so I thought I would start my own blog so I can also share my work with other like minded people.

I started hand sewing when I was quite young, encouraged by my mum who is very good at all forms of sewing, quilting and knitting. I now enjoy a wide range of embroidery and have completed pieces in canvas work, goldwork, hardanger and of course, cross stitch. My local embroidery shop offers embroidery classes and each year I try to learn a new technique each year. Below is an Elizabethan goldwork piece that I learnt to make in a class at Nancy's Embroidery in Wellington.
Goldwork 'W'
I'm currently working on the Gingerbread Village, by The Victoria Sampler. You can read more about the  pieces I have completed by clicking here.


About 10 years ago I dipped my toes into the quilting world and took a year long course to make a sampler quilt. I enjoyed it so much that I have carried on quilting. Although I machine piece, I like to hand quilt my quilts. I currently have 4 quilts on the go that I would like to complete in 2014.  Below is my Sashiko quilt which I designed and made in 2012. Each of the dark navy blocks is hand stitched with a sashiko pattern. I wrote a post on how I made it here.

Sashiko quilt

My main quilting project at present is "Your Place or Mine?". It's a wool felt applique block of the month, designed by Wendy Williams of Material Obsession in Sydney. You can read more about my progress here. I just love the bright colours in this quilt, and all the Kaffe Fasset fabrics.

Your Place or Mine? Block of the Month
I do appreciate you visiting my blog and reading about my quilts and embroidery. If you would like to be entered into the draw for two uniquely flavoured New Zealand fat quarters, please leave a brief comment below. Entries close on 15 Feb 2014.

NZ fat quarters 
One fabric has Buzzy Bee (a favourite noisy toy for toddlers to pull along behind them), and the other has Pukekos (a New Zealand native swamphen bird). I will post these anywhere in the world, because I realise that the likelyhood of the winner being in New Zealand is very low. Good luck!!

Thank you for stopping by.
Wendy

Monday, 20 January 2014

My Sashiko Quilt

In 2012 I embarked on a mission to make a Sashiko Quilt and this was the result:

Sashiko Quilt
Sashiko detail

Why did I decide to make a Sashiko quilt? There were three reasons:
1. I saw the lovely shiny Japanese fabrics stacked up my local quilt shop and thought, "aren't those lovely!".
2. We were about to have a Japanese exchange come and stay with us for three weeks, and later in the year my son would be going to Japan for three weeks.
3. I thought it would be fun to experiment with the hand stitching on the dark panels.

Sashiko Quilt
I didn't realise how mathmatically challenging it would be, but I am an accountant, so I just pulled out my calculator and graph paper and managed just fine.


Here's how I went about making my sashiko quilt:

- I chose a simple pattern with quite big squares for the shiny Japanese fabrics, so I could still see them easily in the finished quilt. I chose a range of the dark indigo fabrics.
- I started to piece the quilt into sections of about 12 blocks. Each of the individual blocks measures 8.75" x 8.75" when finished. I knew I wanted to do the sashiko before the whole quilt was pieced together, but I also knew that the dark indigo blocks needed to be pieced before I did the sashiko so I could stitch to the very edges of them.
- I used library books and the internet to research sashiko patterns. I found lots of designs that I liked, but I had to scale them to fit my blocks.

Some of the sashiko patterns I used in my quilt

Navy blocks are 8.75" x 8.75" finished


 - I used tailor's chalk to draw grids on the dark indigo squares to map out where the designs would sit.
- I went over the chalk marks with the sewing machine because they were rubbing off too easily.
- I hand stitched the Sashiko patterns between the grid lines with Ecru DMC Perle 8. (Sashiko thread is expensive in New Zealand and I knew I would need alot.)
- I pulled out all of the grid lines I'd made with machine stitching.


- Once all of the hand stitching was done, I joined all the sections together and formed the quilt.
- I had quilted simple grid lines and diagonal lines through the shiny blocks and left the sashiko blocks as they were. I didn't want to distract from the sashiko stitching.

The quilt on our bed

The backing, and label of course!
I'm really pleased with how this quilt turned out. It has wool batting in it so is my warmest quilt and we use it in the winter.


The facts:
Each of the navy blocks measures 8.75" x 8.75" finished.
I used ecru Perle 8 for the sashiko stitching.
I did all of the sashiko before I made the quilt sandwich.
The quilt has wool batting.
The finished quilt measures 62" x 80".


Friday, 17 January 2014

2014 Pantone Quilt Challenge - Radiant Orchid

I've never entered a quilt challenge before, but I've decided to enter the 2014 Pantone Quilt Challenge - Radiant Orchid. You can read all about it by clicking on the button on the right hand side of my blog.

My main reason for entering is that I just love the colour. I had a quick look in my wardrobe and found the following:
my personal collection of Radiant Orchid
Yes, I've got plenty of clothes that match the colour scheme, but strangely enough I haven't used these colours in my quilts to date. I have made a few canvas work designs in these colours, but no quilts. So now I'm out shopping for fabrics!!

I think I've settled on a design, but I'll keep it to myself at this stage. This challenge only runs for two months, so all will be revealed on 26 March. I'm looking forward to seeing what everyone else does with Radiant Orchid as their main colour. The rules are really loose, so there will be a wide variety of finished projects to view.


Wednesday, 15 January 2014

Candy Cane Cottage

Some of you will be aware that I'm making the Gingerbread Village from The Victoria Sampler. I finished the church and the house at the end of 2012.

You can read more about theses items here.

Last night I finished the stitching on the Candy Cane Cottage. I've only got the Pinkeep to finish now, and I hope to finish that tonight.
Candy Cane Cottage

I'll leave these pieces like this until I've also finished the Gingerbread Bakery. Mounting the stitched pieces onto padded cardboard is quite fiddly, so when both projects are finished I'll setup a production line and do them both at once. The Candy Cane Cottage stands about 3 inches tall and 3 inches long so it's quite small. I aim to have them both made up before the end of May this year.

The bakery pattern was only released in December and it arrived in the post box of Chirstmas Eve! Just in time to go under the tree. I've got my threads and linen sorted and hope to start on it this week.

Gingerbread Bakery

Saturday, 11 January 2014

'Joy to the World' is finished

Last night I finished the Mill Hill 'Joy to the World' and I'm really pleased with how it' turned out.

Mill Hill Button and Bead Christmas pictures

The finished product looks better than the picture on the packet - mainly due to the way that the beads bring it to life - especially the gold ones on the lettering.

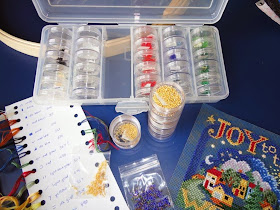
There's always quite a few beads and threads left over from these kits, so I store them away in these little containers. That way I have spare beads on hand when I'm working on other projects.

Tuesday, 7 January 2014

Your Place or Mine progress report

Today I'm working on the border which will run around the outside of the hand appliqued sections.


It's made from half square triangles using a fairly plain spotted fabric, and a wide range of Kaffe Fassett bright fabrics. I sewed 82 half square triangle units on Sunday! Now I'm joining them into long strips and trying to make sure that the points all point the correct way. I love all the Kaffe fabrics - they are so bright and go really well with the bright felt.


Sunday, 5 January 2014

Mill Hill buttons and beads kits

I was delighted to receive another Mill Hill buttons and beads kit for Christmas from my mum.

It is called 'Joy to the World' and is very appropriate, because her name is Joy! This one is on a navy background which is new for me. All of my others have been on beige. These kits are actually worked on perforated paper which is quite unusual. I've got used to to now, but it was a bit different to start with. All of the cross stitch is completed first and then the beads are sewn on. The button is the final thing to be sewn on (otherwise the threads would catch on it). The photo shows my progress to date - mainly achieved while watching tennis and cricket on TV.

Below are photos of the other kits I have completed. The Toy Shop is my favourite.


Thursday, 2 January 2014

Your Place or Mine? - month 4

Yes, I've finished month 4 of the block of the month now too. It's a row of brightly coloured boat sheds, inspired by those on the beach at Brighton, in Melbourne, Victoria, Australia.


There are many brightly painted boat sheds at the beaches along Port Phillip Bay. Here's a few of the type that provided Wendy William's inspiration when she was designing this block:

These boat sheds are highly sought after - they can cost over $200,000 for a 9 square metre boat shed!! You can't live in them, but you can store your beach equipment in there and small boats.

Block 5 is in the post now and I will get it when I get back from my holiday.