Monday 30 November 2015

Scrappy Bear Paw quilts for Capital Quilters

It was our last guild meeting of the year on Saturday, and I got to see everyone else's scrappy bear paw quilts.  They looked fantastic hung around the hall.


Members of our guild, Capital Quilters, were invited to make a scrappy bear paw quilt to celebrate our guild's 30th anniversary.  Our guild's logo is the bear paw because of it's meaning as the hand of friendship.


25 members (out of a total of 180) made bear paw quilts and they all bought them to show and tell on Saturday.  The hall looked lovely and very colourful.


You can see lots more photos over on the guild's blog - click here!  Adrianne (from On the Windy Side) and I are keeping it up to date now, so we encourage you to check back often, or even better, become a follower via Bloglovin or your preferred feed.

Mine is just left of centre in that photo above.  Here it is again in case you've forgotten.


I really enjoyed making this, knowing others in the guild were making the same style of quilt too.

Tuesday 24 November 2015

Gingerbread Village finishing tips

A number of people have asked me about the skills required to finish the Gingerbread Village buildings nicely.


I hadn't had any experience at this type of finishing before I started making my village.  I just followed the instructions in the patterns, and although it took time and patience, I'm happy with my results. The patterns contain very clear photos showing what to do for each step. You can't hope to assemble a building in one afternoon, but if you allow a few days I'm sure anyone can do it.

I still aim to improve further, but I'm learning with each one, and gradually getting better at finishing.

 Here are some progress shots from my Haunted House.

checking that the pieces are symmetrical

I use an old rotary cutter to cut the cardboard. I used to use scissors, but they struggle to cut through the thick cardboard, and the edges aren't straight enough.

pinning the pieces is very important before gluing
I use an acid free craft glue with a similar consistency to PVA.  I spread it around with the little foam brush.

The back stitching needs to be right on the edge of the cardboard

I keep special pins aside just for building these houses.  They do get glue on them sometimes and are then no good for fabric sewing.

Joining sections together

Although a bit awkward to use, the curved needle was great for attaching the turret to the house

Not all the houses have bases in the patterns.  However, I've decided to give mine all bases because it keeps the house nice and "square".  I put my name on the bottom of each house.  I've mapped it out on graph paper, and use it as a permanent reminder of who stitched these houses.


I dyed my own linen for the roof of the haunted house.  I wouldn't do it for the gingerbread, but I was comfortable to try for the roof.  The fist time it wasn't dark enough, so I just strengthened the mixture and dyed it again.


I'm happy with the result and will do it again if I want a unique colour.


I hope you find these finishing tips useful.  I've created a whole page about my Gingerbread Village now and you can read more there. There's a link under the cover photo at the top of my blog. 

My Gingerbread Village

It's getting close to Christmas and it's almost time to get my Gingerbread Village out again.

All of these beautiful houses were designed by The Victoria Sampler in Canada, and stitched by me.


I've now created a separate page on my blog with links to all my previous posts about this village. It's just under the cover photo and called "Gingerbread Village".

When I made my first gingerbread house back in 2012 I was worried about how I would assemble it. However, all the patterns have great instructions and colour photos so it really wasn't too difficult, but it did take time. The lid lifts off this house, so the inside had to finished beautifully too, with walls lined with fabric.


I made the Gingerbread Church in 2012 too. Although the stitching was a bit simpler on the church, attaching the steeple was difficult and I now realise I should have used a curved needle. I made sure I had one on hand for the Haunted House assembly in 2015.

my Gingerbread Church

During 2013 I stitched the Candy Cane Cottage, but the fine beading took a long time, so I didn't assemble the cottage until 2014.

Candy Cane Cottage

I made my Gingerbread Bakery in 2014. I learnt that the cardboard for the walls all needs to be symmetrical in order for the house to sit evenly on it's base.  Now I sit the pieces next to each other and compare lengths before attaching the fabric. I love that giant gingerbread man above the door, and the ladies baking the cookies.

the Gingerbread Bakery

I made the Gingerbread Haunted House in 2015.


Finishing the Haunted House has given me motivation to carry on with the next houses in this series. They are all beautifully designed and I love bringing them out at Christmas.

I hope to finish the Gingerbread Christmas Tree Etui before Christmas 2015.


My visit to Christchurch

Last week I spent two nights in Christchurch for work.  I had planned a conference for 100 people at the beautiful Hagley Oval.  Thankfully it all went well, and there were no hiccups.


Hagley Oval is a cricket ground in Hagley Park, in the middle of Christchurch city.  The new Hadlee Pavilion was a great place to hold a conference. If you watched any of the Cricket world Cup earlier in the year you would have seen this pavilion in use.

lunch break


before dinner drinks

I also had time for a bit of a look around the central city. Christchurch was hit by a huge earthquake in February 2011.  185 people died in that earthquake, and since that time, many buildings have been demolished because they don't meet the building code now.  Other buildings are being saved, but need earthquake strengthening, and as a result, the central city is very bare.

Here's some of what I saw:

The view from my Rendezvous Hotel room - it's so flat, and so empty

Gloucester Street - no shortage of parking in the city

The Christchurch Cathedral - all fenced off and very dangerous

The Cathedral - photos taken through the fence

The Arts Centre - all closed off for repairs

repairs at the Arts Centre
awaiting demolition - I saw a number of buildings like this in the central city
the Avon River
I left feeling sorry for Christchurch - both for the people and for the city.  Rebuild progress has been a lot slower than many would have liked. I guess life goes on out in the suburbs, but the central city really is a barren wasteland at the moment.  Unfortunately it will be many years yet before it returns to being a vibrant city, however I know there are great plans in the pipeline.


Tuesday 17 November 2015

Caravan Sewing Machine cover

How cute is this??

It's my new sewing machine cover, custom made by my mum and me to fit my new Bernina 550QE (with the table still attached).

Caravan Sewing Machine cover

It's always good to have a project to work on on when mum comes to stay.  She helps me with all the tricky bits I might get stuck on. Mum never lets me abandon projects - she always sorts them out for me.

I got my new machine back in June, and knew it needed a dust cover.  The machine came with a bag for transporting it, but I didn't want to lift it in and out of the bag each day. I wanted a cover I
could just pop over it at the end of each day.

the back view

I spend a fair bit of time on Instagram, and I'd spotted a great version of this machine cover a few months ago.  I went to Rainbow Hare on Etsy and purchased the pattern for only a few dollars.

It came as a downloadable pdf with many pages, so I just stored it on my iPad and only printed out the pages I really needed.  Mum and I changed the length and width of the pattern to suit my machine.  The height was fine.

We used Soft and Stable instead of interfacing.  It's a great product for this type of thing - it's soft, and yet stable, just like the name says.  It means the caravan is almost free standing, but can also be folded up if necessary.


If you're tempted to make one yourself, just allow plenty of time.  The doors and windows took me a whole afternoon. Cutting, assembling, quilting and fitting the caravan part was spread over 2 or 3 days.  Hand sewing on the windows and door, and turning up the grass on the bottom took time. As did hand sewing on the little daisies and making the bunting.  Of course you don't have to add all the little finishing touches like I did, but I think that's what makes it so cute.

Great idea and pattern thank you Rainbow Hare. You can see more information on her blog here.

Thursday 12 November 2015

More of my la passacaglia

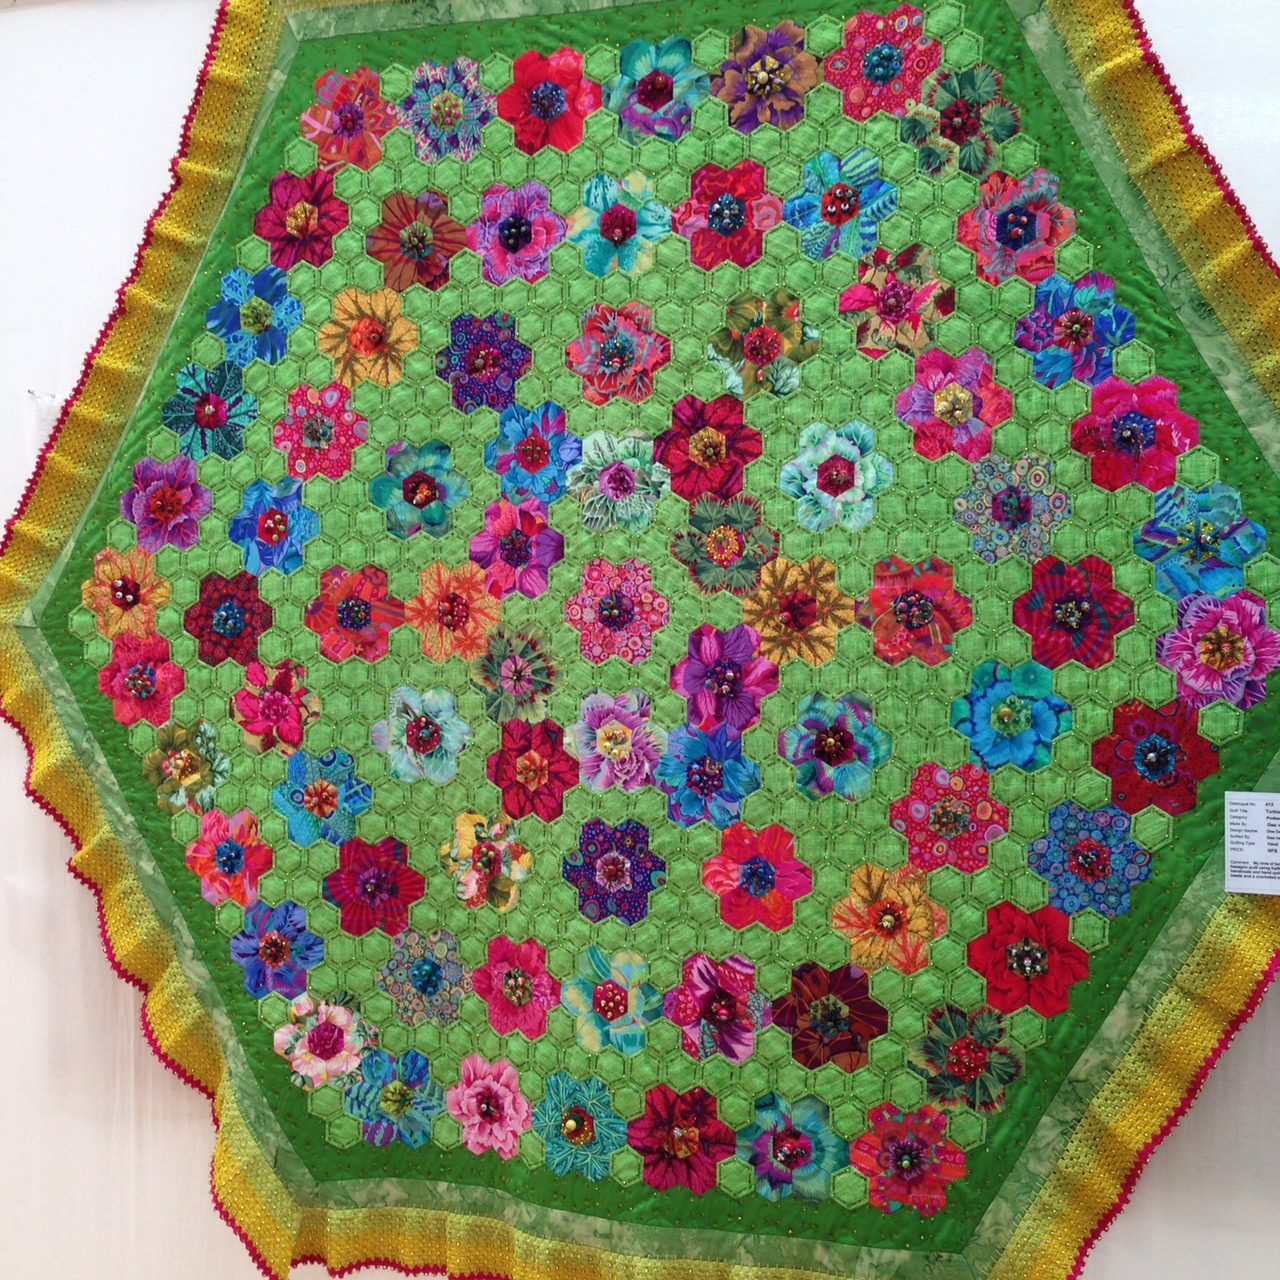
Last night I took a little road trip with my friend Shirley Mooney. We went to Levin because Shirley had been asked to speak at Town and Country Quilters. Together we talked about Millefiori Quilts, and the guild members were very interested to see the wide range of quilts being made from the books by Willyne Hammerstein.  Many of the guild members have made Grandmother's Gardens with English Paper Pieced hexagons, but most of them hadn't seen quilts like this.


I took a little break from my la passacaglia after I got the bottom half joined up in October (it's the top half in this updside down photo).  The break didn't last long though, because I'm back at it, and the end is in sight. Well, I say the end, but what I mean is getting all the rosettes joined up.  Putting filler pieces in to create a straight edge is another matter, and actually quilting it is a totally different matter, but just getting all the rosettes joined up will be a major achievement.


I keep laying it out each morning and modifying my plans slightly.  I'm pleased to say that I haven't had to unpick any of the rosettes yet. I don't sew the rosettes together unless I'm really convinced they are right.  I loathe the idea of having to unpick, because the thread is so fine and the stitches so tiny.

I do have a stash of rejects, or those that haven't quite made the cut yet.  They may be used as fillers on the edges, in places where they are going to cut in half. The colours and patterns in the rejected rosettes just don't quite fit in the centre of the quilt.

Some of the pieces in the rejects box

In the Millefiori / la passacaglia facebook group we have over 4,000 members now, and it's exciting to see people reaching significant milestones.  We have about 15 quilts in the "Finished Quilts" photo album, although some are just tops at the moment.  I joined the group back in January, so I've known some of these people for almost a year now. We've all shared the journey and encouraged each other along the way.

We share photos and tips like these:

three different ways of using the same fabric

different ways of using the same fabric

Anyone can ask to join the group - just search "Millefiori / la passacaglia" on facebook and request to join.

I've setup a new page on my blog so all my la passacaglia posts can be viewed from there. Just click l passacaglia under the header photo.


The following lovely people have left comments on previous posts, but unfortunately I can't reply because they are showing as No Reply Bloggers.
Karen Poole

Sunday 8 November 2015

Auckland Festival of Quilts - the quilts (finally)

In my third and final post on the Auckland Festival of Quilts, I'll finally show you some of the quilts I really admired.

First up is my favourite - Fabulous Feathers by Carol Newsham.  It's a Kim McLean pattern from Glorious Applique, made with Kaffe Fassett fabrics (in my favourite shades) and all hand quilted.  All my favourite elements in one quilt.


All those ribbons!

look at all that hand quilting

I just loved this - Carol has done an amazing job with all the applique and the hand quilting.


I'm not sure how this was made, but I think I need to take a class with Rosemary Rush in the near future to find out.  I'd love to make something similar myself.


My Nearly Insane Journey by Sue Flego


Yes, four photos of the same quilt, because it looked so different through the lens as I approached it.  This stunning quilt was made by Sue Flego.  Sue blogs at Susannas Quilts and clearly has a few more intricate quilts in the pipeline.

My mum is making a Nearly Insane quilt in blue and white, so we took great interest in this one.


A Good Man's Quilt by Val Williams
I love how Val has hand quilted the circles into this quilt.  They unify all the scraps she was trying to use up.


by Gae van Holst - hand stitched, beaded and hand quilted - see below for more info


Flower Power by Dawn Borovich
 This is a single fat quarter, enhanced with beading and embroidery. Dawn Borovich made it in a class with Allison Smith.


Best in Show - Dear Jane by Mary Hawke, quilted by Colleen Burr
The Best in Show was a Dear Jane by Mary Hawke. It was beautiful, but I don't feel the need to put Dear Jane on my personal to do list.  I know many quilters do, but at the moment I can leave this one off.  I do feel seriously tempted by Kim McLean Glorious Applique patterns though (see top of this post).  Who knows what I'll think in 10 years time though!

You can see a totally different selection of quilts from the Auckland Festival of Quilts on my friend Shirley's blog - Don't Wait to Create.  I love that two people can go the same show and choose very different highlights.